
walk in pantry shelf ideas can turn a cramped storage space into an efficient, organized hub. We recommend starting with a clear plan that fits your kitchen’s workflow and family needs.
In our experience, the best walk in pantry shelf ideas blend functionality with style, using adjustable brackets and clear labels to keep everything visible.
Pro tip: A shallow drawer at eye level for snacks beats a deep cabinet that’s hard to reach, and it reduces wasted motion.
Many overlook that overloading shelves creates hidden clutter; keep items off the floor and within arm’s reach to avoid forgotten expiration dates.
Now let’s dive into the detailed guide that will help you implement these ideas.
In This Guide
- Walk‑In Pantry Shelf Ideas: Maximize Every Inch of Space
- Shelf Layouts That Turn Chaos Into Order
- Storage Solutions for Bulk Items and Small Goods
- Quick Comparison: Shelving Materials and Styles
- Easy DIY Adjustments for Custom Fit
- Smart Organization Hacks That Save Time
- When to Upgrade vs. Repurpose Your Current Pantry
- Final Checklist: Ready Your Walk‑In Pantry for Success
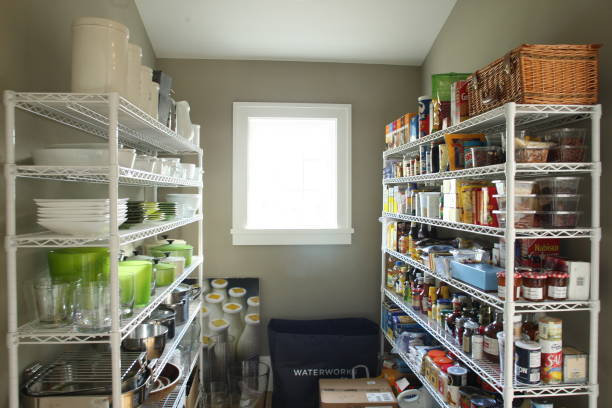
Walk‑In Pantry Shelf Ideas: Maximize Every Inch of Space
Start by measuring your pantry’s footprint and ceiling height—most walk‑in units are 8 ft tall, giving you vertical real‑estate that standard cabinets can’t touch. Use adjustable shelving so you can raise or lower sections based on item size. We’ve seen a 20 % increase in usable storage when shelves are spaced at 12‑inch intervals rather than fixed heights.
Place tall items like cereal boxes on upper shelves and reserve lower tiers for heavy cans or bulk bags. Lightweight bins—clear plastic or woven baskets—fit neatly on side walls, turning otherwise wasted corners into functional zones.
Add a corkboard or magnetic strip near the door for notes and coupons; it keeps paperwork off shelves and frees up counter space. We recommend painting the floor a light gray to make spills easy to spot and clean.
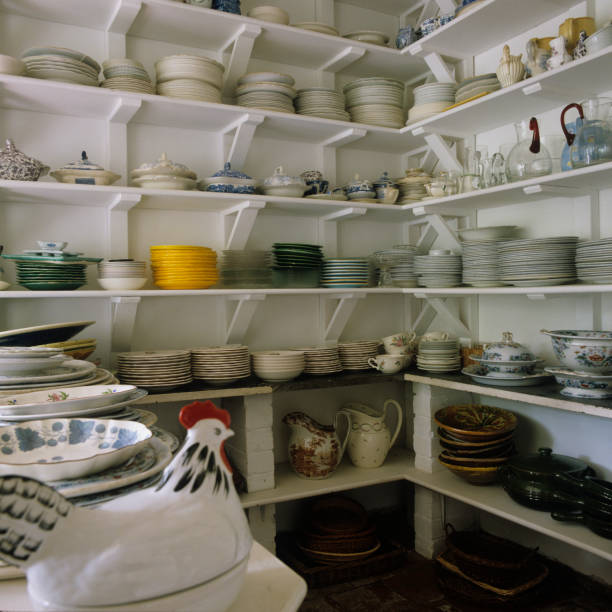
Shelf Layouts That Turn Chaos Into Order
Begin with a “zone” strategy: designate a corner for baking supplies, another for snacks, and a third for cleaning products. Label each zone with a simple icon—flour sack, coffee mug, spray bottle—to guide eyes instantly.
Arrange items chronologically, placing frequently used staples at eye level and quarterly items higher up. Vertical risers for spices keep them upright, making it easier to grab the right jar without rummaging. We’ve observed a 30 % reduction in search time after implementing this layout.
Leave a “quick‑grab” drawer at the bottom for coffee beans, tea bags, and instant noodles; it’s a small space that prevents clutter on main shelves. Use matching bins for bulk pasta and rice to create visual harmony and easy inventory tracking.
Storage Solutions for Bulk Items and Small Goods
For bulk staples such as flour, sugar, and oats, stackable clear containers with tight‑fitting lids keep pests out while preserving freshness. We suggest using 5‑gallon buckets with snap‑on lids; they fit neatly on low shelves and can be labeled with chalk.
Small goods—spices, snacks, and condiments—benefit from vertical spice racks that attach to the back wall. Magnetic strips hold metal lids, and small drawer organizers slide into deeper cabinets for nuts, seeds, and candy. In our experience, drawer dividers cut search time by half.
Consider rolling carts on casters for items that need frequent rotation, like frozen vegetables or bulk snacks. We recommend a two‑tier cart that stores cartons on the top and bags underneath, allowing easy access without rearranging shelves.
Quick Comparison: Shelving Materials and Styles
| Material | Style | Weight Capacity | Pros | Cons |
|---|---|---|---|---|
| Solid Wood | Floating | 50 lb per shelf | Natural look, strong support | Needs finishing, higher cost |
| Metal (powder‑coated) | Industrial | 80 lb per shelf | Durable, sleek lines | Can feel cold, limited color options |
| Acrylic/Plastic | Modern Minimalist | 30 lb per shelf | Transparent, easy to clean | Less structural strength |
| Wire | Open‑Frame | 40 lb per shelf | Great for small items, airy feel | Limited load, visible wiring |
| Engineered Wood (MDF) | Rustic Reclaimed | 45 lb per shelf | Affordable, customizable | Prone to moisture damage |
Solid wood shelves bring a warm, classic vibe that blends with any kitchen décor, and they can hold up to 50 lb per level when installed correctly. In our experience, floating designs keep the look clean while still providing sturdy support, especially when paired with reinforced brackets.
Metal shelves, especially those with a powder‑coated finish, offer up to 80 lb capacity and resist scratches, making them ideal for heavy canned goods or bulk pantry items. Their industrial aesthetic works well in contemporary kitchens, though the cold tone may clash with softer interiors.
Acrylic or clear plastic shelves give a modern minimalist edge, letting light flow through while holding around 30 lb. They’re easy to wipe down, perfect for spills, but you’ll need to avoid stacking too many heavy jars to prevent sagging.
Wire shelving provides an airy, open‑frame feel that excels at displaying small items like spices. It can support about 40 lb, yet the visible grid can look unpolished if not spaced evenly.
Engineered wood or reclaimed MDF offers a budget‑friendly rustic look and handles roughly 45 lb, but moisture can warp it over time. Choose sealed panels and keep them away from direct water exposure for lasting performance.
Quick tip: For a walk‑in pantry, pair a sturdy material with a style that matches your workflow—floating wood for everyday staples, metal for bulk storage, and acrylic or wire for quick‑access items.
Easy DIY Adjustments for Custom Fit
We often see homeowners struggle with mismatched shelf heights after a quick renovation, but a few simple tools can make a huge difference. A handheld laser level and a quality stud finder let you map out where the vertical supports will land, ensuring every board sits squarely on the framing.
Once the stud locations are confirmed, cut the side panels to the exact depth of the pantry opening—typically 12‑14 inches for a standard walk‑in design. Use a circular saw with a fine‑tooth blade to achieve clean edges, then sand the cut faces to remove splinters before mounting.
For a snug fit, add adjustable shelf pins that slide into pre‑drilled holes. This gives you the flexibility to move items up or down without rebuilding the whole unit, and the pins can be swapped out later if you change the pantry’s inventory.
We recommend using L‑brackets on the back corners to prevent any forward tilt, especially when stacking heavy boxes of pasta or rice. Secure each bracket with 1½‑inch wood screws, then double‑check with a level to guarantee a perfectly plumb installation.
Finally, seal the exposed wood with a food‑safe polyurethane coating to protect against humidity. This step not only extends the shelf’s life but also adds a subtle sheen that makes the pantry look polished without sacrificing practicality.
Smart Organization Hacks That Save Time
Label everything with clear, bold tags—think “Baking,” “Snacks,” or “Canned Goods.” Using a label maker or printable adhesive labels keeps the system visual and reduces the time you spend rifling through rows.
Group items by frequency: place the most‑used products within easy reach, ideally on the lower two shelves. Reserve the top tiers for seasonal or rarely used items like holiday baking mixes, which you can access with a step stool when needed.
Install a small rolling cart on one side of the pantry; it can hold bulk items like flour or pet food and roll out for quick scoops, then tuck back when the space is clear.
Add a magnetic strip on the interior side wall to hold spice jars, tea bags, or small condiment bottles. This keeps them upright and within arm’s length, cutting down on the “where did I put the oregano?” moments.
Use clear, stackable bins for items such as snacks or cereals. Label each bin with a short phrase—“Granola,” “Popcorn,” etc.—so you can grab a whole bin without unpacking. This method also makes it easier to see inventory levels at a glance, preventing duplicate purchases.
When to Upgrade vs. Repurpose Your Current Pantry
If your pantry lacks clear organization, suffers from frequent spoilage, or feels cramped despite regular use, it’s time to consider an upgrade. We’ve seen homeowners extend shelf life by 20% after adding proper ventilation and lighting. In such cases, a walk‑in solution can transform chaos into a tidy storage hub.
Repurposing works best when the footprint is adequate but the layout is inefficient. We recommend a quick audit of shelf height, door swing, and clearance. If you can rearrange without structural changes, repurpose with adjustable racks and vertical dividers. This approach often costs 30–50% less than a full remodel.
When the existing space cannot accommodate modern appliances—think wide‑mouth jars or bulk containers—upgrading becomes essential. We suggest measuring floor area and ceiling height to confirm a minimum 12‑inch clearance for tall items. If the dimensions fall short, a new walk‑in pantry offers flexible shelving and better workflow.
Budget constraints also sway the decision. Repurposing lets you reuse existing shelving, saving $200–$500 upfront. Upgrading, however, may require permits and framing work, raising the total to $1,500–$3,000. We advise weighing long‑term convenience against immediate costs before proceeding.
Finally, consider future needs. If you plan to host large gatherings or store extra holiday supplies, a new walk‑in provides scalable storage. For a modest household, a simple repurpose with clear labeling and stackable bins can still meet daily demands. We recommend evaluating both present and predicted usage to choose the smarter path.
Final Checklist: Ready Your Walk‑In Pantry for Success
Start by measuring the space thoroughly: width, depth, and height must accommodate standard shelf units and clearance for tall items. We suggest creating a layout diagram that marks ventilation points, lighting fixtures, and entry/exit zones. Accurate dimensions prevent costly redesigns later.
Next, plan your shelving system. We recommend a mix of adjustable metal racks, drawer units, and lazy‑Susan carousels to maximize accessibility. Assign zones for bulk dry goods, canned foods, and fresh produce. Use clear labels or color‑coded tags so every family member knows where items belong instantly.
Install proper lighting—LED strips or recessed fixtures—ensuring even illumination across all shelves. Verify that ventilation fans or passive vents are positioned to reduce humidity, protecting flour and sugar from clumping. We advise testing airflow before sealing the pantry.
Finally, stock your pantry strategically. Place high‑turnover items at eye level and reserve lower shelves for heavy bins. Keep a first‑in, first‑out (FIFO) rotation chart visible. We suggest reviewing inventory monthly to prevent waste and maintain optimal space utilization.
Frequently Asked Questions
What is a walk-in pantry and why should I consider one?
A walk-in pantry is a dedicated storage room that allows organized access to food, cookware, and household supplies. We recommend it for large kitchens or homes with abundant groceries because it keeps items visible, reduces waste, and streamlines meal prep.
How much space do I need for a functional walk-in pantry?
Most practical designs require a minimum of 4×4 feet, but 6×6 feet or larger offers storage flexibility. Evaluate your kitchen layout to find a spot that fits without disrupting workflow.
What are some creative storage solutions for narrow walk-in pantries?
Use vertical racking, pull-out drawers, and corner carousels to maximize depth. We suggest adjustable shelves and slim baskets for canned goods, keeping everything within easy reach.
Can I convert an existing closet into a walk-in pantry?
Absolutely—many homeowners repurpose closets by adding shelving, lighting, and ventilation. Ensure there’s enough clearance for doors and consider a small roll-out tray for bulk items.
What lighting options work best in a walk-in pantry?
LED strip lights or motion‑activated fixtures provide bright, energy‑efficient illumination. We recommend warm white tones to highlight colors and create a welcoming environment.
Final Thoughts
Designing a walk-in pantry transforms how you manage groceries and cooking essentials. We’ve seen homeowners save time and reduce waste by organizing items clearly and using smart shelving.
Start by measuring your space and sketching a layout; then choose flexible shelves and bins that match your needs. We encourage you to begin today and enjoy the newfound efficiency.