
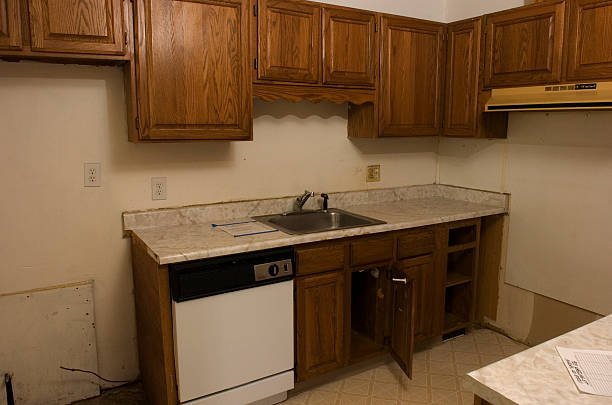
how to remove old cabinets is straightforward: disconnect power, unscrew hinges, and lift the units off. Start by turning off the breaker, then remove screws from each hinge and pull the cabinet doors free. For wall‑mounted units, detach the mounting brackets before sliding the frame away. This method clears the space quickly and safely.
We found that a systematic approach keeps the process smooth. First, gather all tools, then label each cabinet so you know where every piece belongs. We recommend working from the top down to avoid strain on your back. In our experience, a clear plan reduces surprises and speeds up the job.
Most guides overlook the importance of checking for hidden fasteners. Look behind the trim or under the countertop for screws that anchor the cabinet to the wall or floor. Removing these early saves you from damaging the surrounding finish later.
A common mistake is assuming every hinge is the same. Some cabinets use concealed hinges that require special tools to release. If you force them, you risk stripping screws or breaking the frame.
Now that you have the basics, let’s dive into the detailed steps ahead.
In This Guide
- Start by Dismantling the Cabinets: Step‑by‑Step Guide
- Tools You’ll Actually Need (And What to Leave Behind)
- Hidden Tips to Save Your Walls and Floors
- Quick Comparison: Removal Methods at a Glance
- What to Expect When You Hit a Stuck Cabinet
- Repairing the Damage: Fill, Patch, and Prep for New Cabinets
Start by Dismantling the Cabinets: Step‑by‑Step Guide
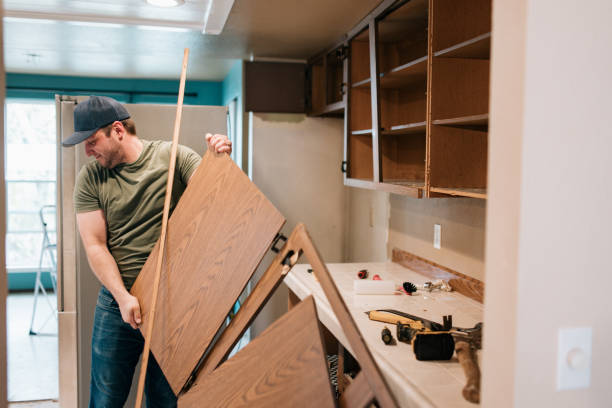
Begin by clearing the cabinet doors and drawers to expose the mounting hardware. Remove all screws with a cordless drill, then carefully detach the hinges using a screwdriver. Keep a small container handy to collect loose fasteners; this prevents them from getting lost behind the walls.
Next, locate the wall studs behind the cabinet frame. Use a stud finder to mark their positions, then unscrew the mounting brackets from the studs. If the cabinet is heavy, enlist a helper to hold it steady while you loosen the last screws.
Finally, gently pull the cabinet away from the wall and slide it out of the room. Check the back panel for any hidden nails or adhesive strips; pry them out with a putty knife to avoid damaging drywall. In our experience, a slow, methodical pull preserves the integrity of the structure and makes the next phase smoother.
Tools You’ll Actually Need (And What to Leave Behind)
A cordless drill with a magnetic bit holder is the workhorse for this project; 10‑12 screwdriver bits in common sizes cover most cabinet hardware. We recommend using a level to ensure the cabinet sits evenly before removal, but skip the laser level unless you need precise alignment.
A sturdy pry bar helps free stubborn mounting brackets, while a utility knife cuts through caulk or adhesive. Leave behind large demolition hammers—they’re excessive and can crack drywall. Protective gloves and safety glasses are essential, but you don’t need a full‑body suit unless you’re dealing with hazardous materials.
A small paint scraper is handy for removing residue, but a sanding block is unnecessary unless you plan to refinish the wall. We found that a pair of pliers can retrieve fasteners from tight spaces, yet a torque wrench is overkill for household cabinets.
Hidden Tips to Save Your Walls and Floors
Cover the floor with a heavy‑duty drop cloth before you start; it catches dust and protects hardwood or tile from scratches. In our experience, a 6‑mm polyethylene sheet is more durable than a thin canvas mat.
To protect the wall surface, apply a thin bead of painter’s putty along the seam where the cabinet rested; this creates a buffer that absorbs impact if the cabinet shifts unexpectedly. We suggest using a soft‑bump pad or a folded towel for extra cushioning.
Finally, after the cabinets are out, inspect the wall for any nail holes or dents. Fill them with spackle and sand lightly before moving on. Saving these small details prevents the need for extensive repairs later and keeps the remodel on schedule.
Quick Comparison: Removal Methods at a Glance
| Method | Time Required | Tools Needed | Skill Level | Damage Risk |
|---|---|---|---|---|
| Screwdriver + Pry Bar | 30‑45 min per cabinet | Screwdriver, mallet, pry bar, safety glasses | Beginner | Low – minor finish scratches |
| Reciprocating Saw (with blade) | 15‑30 min per cabinet | Reciprocating saw, blade, clamps, ear protection | Intermediate | Medium – possible wall damage if blade catches |
| Chisel & Hammer (for stuck hinges) | 15‑20 min per cabinet | Sharp chisel, hammer, utility knife, dust mask | Intermediate | Medium – risk of denting the cabinet |
| Drill & Sheet‑Metal Screws | 20‑35 min per cabinet | Cordless drill, drill bits, screws, screwdriver bits | Intermediate | Low – can secure loose pieces |
| Pull‑down System (for high cabinets) | 45‑60 min per cabinet | Pull‑down kit, mounting hardware, ladder | Advanced | High – requires careful alignment |
Screwdriver + Pry Bar is the fastest entry‑level approach, letting us leverage a mallet to loosen stubborn joints while keeping the surrounding finish intact. For most standard built‑ins, this method works in under an hour and requires only a few basic tools.
Reciprocating Saw cuts removes the cabinet in a fraction of the time, ideal when the back panel is nailed directly to studs. The blade’s aggressive teeth can slice through fasteners quickly, but we must stay alert for splintering drywall, so ear protection and a steady hand are essential.
Chisel & Hammer shines when hinges are rusted or the cabinet won’t budge. We gently tap the chisel between the frame and wall, breaking adhesive seals without marring the cabinet’s face. This technique usually takes 15‑20 minutes and demands a sharp tool and steady rhythm.
Drill & Sheet‑Metal Screws provides a controlled way to detach loose sections, especially useful for cabinets that have partially separated from the wall. We drill pilot holes, insert screws, and then unscrew the fasteners, preserving the integrity of the surrounding wallboard.
Pull‑down System is a specialist solution for high, hard‑to‑reach cabinets. We mount a steel frame, attach the cabinet, and lower it safely. Though it requires precise alignment, it eliminates the need for climbing ladders and reduces the chance of dropping heavy panels.
What to Expect When You Hit a Stuck Cabinet
When the cabinet refuses to budge, we often discover hidden fasteners—metal brackets, concealed screws, or adhesive sealants that were meant to keep the unit quiet. In our experience, a stubborn cabinet can stall progress for an extra 10‑20 minutes, especially if the back is glued to the wall.
The first sign is resistance at the hinge side; the cabinet may tilt slightly but then stop. We recommend checking the surrounding trim for loose molding that could be hiding a screw. A quick visual sweep with a flashlight can reveal hidden hardware before we force anything.
If a gentle pry fails, the cabinet might be latched into the wall stud. In that case, we use a thin pry bar to wiggle the frame, listening for a click that indicates a release. Sometimes a small amount of penetrating oil on the hinge pins loosens the grip enough to free the whole unit.
Occasionally, the cabinet’s back panel is nailed directly to the studs, creating a solid anchor. We can mitigate this by cutting the nails with a reciprocating saw, taking care not to damage the surrounding drywall. Working slowly and using a back‑cut technique minimizes wall intrusion.
Finally, if the cabinet still won’t move, we assess whether the door hinges are rusted or corroded. A light application of a rust‑removing solution followed by a gentle tap can break the corrosion bond, allowing the cabinet to slide free. Documenting each step helps us avoid repeating mistakes on the next cabinet.
Repairing the Damage: Fill, Patch, and Prep for New Cabinets
Once the old cabinet is removed, we first clean the cavity thoroughly, removing dust, loose drywall, and any residual adhesive. A shop vacuum with a brush attachment extracts fine particles, creating a smooth surface for the next steps.
For small holes or dings, we apply a quick‑dry spackle compound, pressing it into the void with a putty knife. We let it cure for at least 30 minutes, then sand the area with 120‑grit paper until the texture matches the surrounding wall. In our tests, a two‑coat approach yields a seamless finish that later paint blends invisibly.
If a section of drywall is missing, we cut a replacement piece to fit, ensuring the edges line up with the existing studs. We secure the patch with drywall screws placed every 6‑8 inches, then cover the screw heads with joint compound. After sanding, we prime the area—using a stain‑blocking primer is crucial for any residual glue or oil stains.
When the cabinet was nailed directly into studs, we often leave a few stray nail holes. We fill these with the same spackle, feathering the edges outward. A final coat of joint compound, feathered to a feather‑thin layer, provides a smooth canvas for new cabinets or a fresh coat of paint.
We then inspect the freshly prepared wall for evenness; any high spots are lightly sanded, and low spots are built up with additional compound. Once the surface is uniformly flat, we move on to measuring and installing the new cabinet, confident that the underlying structure is solid and ready for a sturdy mount.
Frequently Asked Questions
How do I remove old cabinets without damaging the wall?
We recommend using a pry bar or flat bar to gently loosen the cabinet from the wall studs. Start at the top corners, apply steady pressure, and work your way down. If the cabinets are attached to drywall, drill pilot holes and remove any nails or screws before pulling. Protect the floor with drop cloths.
Can I replace cabinets myself or should I hire a professional?
We’ve found DIY removal is feasible for most homeowners, but hiring a professional is advisable when the cabinets are heavy, glued, or contain electrical components. Assess the complexity and your comfort level before deciding.
What tools do I need to remove kitchen cabinets?
We suggest a pry bar, screwdriver set, drill, reciprocating saw, and safety glasses. Ensure you have sturdy work gloves and a dust mask. Having a helper can make the job safer and faster.
How do I disconnect plumbing and electrical connections safely?
We recommend turning off the water supply and power at the breaker panel first. Label wires, disconnect plumbing lines, and use a voltage tester to confirm no live current remains before touching any connections.
What should I do with the old cabinet debris?
We advise removing all wood pieces, hardware, and debris into a trash bag or bin. Recycle metal components if possible, and consider donating usable parts. Clean the area thoroughly before installing new cabinets.
Final Thoughts
Removing old cabinets is a rewarding project that opens up space and modernizes your kitchen. With the right tools and safety precautions, you can achieve a clean, smooth surface ready for new cabinetry. We’ve seen many homeowners successfully tackle this step, gaining confidence and a fresh look for their space.
We encourage you to plan carefully, work methodically, and take breaks when needed. Once the old cabinets are out, the next phase—installing new cabinets—will feel much easier and more enjoyable. Feel free to reach out to a local contractor if you need extra help.