
Five
paragraphs BEFORE the table of contents:
Paragraph 1 (50-70 words): Directly answer the core question of “how to remove old cabinets from wall” in plain language. Get to the point immediately. Include how to remove old cabinets from wall naturally.
Paragraph 2 (50-70 words): Expand on the answer with key context. Use “we” voice (“we found”, “we recommend”, “in our experience”).
Paragraph 3 (50-70 words): Share a specific insight or tip that most guides miss. Make it feel insider knowledge.
Paragraph 4 (50-70 words): Address the most common mistake or misconception about “how to remove old cabinets from wall”.
Paragraph 5 (40-60 words): Brief transition into the detailed guide below.
Then the table of contents div.
Rules: Use “we” (not “I”) throughout. Use for key terms and important phrases. Use for emphasis on standout insights. Do NOT use “Understanding”, “Delving”, “Exploring”. Sound like a knowledgeable friend, not a textbook. Each paragraph MAX 70 words.
After 5 paragraphs, add:
In This Guide
- Step‑by‑Step Guide to Safely Removing Wall‑Mounted Cabinets
- Tools and Gear You’ll Actually Need (and What to Leave Behind)
- Quick Comparison: Removal Methods at a Glance
- How to Avoid Damaging the Drywall Behind the Cabinets
- What to Do With Leftover Wall Anchors After Removing Cabinets
- Troubleshooting Tricky Situations (e.g., stuck hinges, broken screws)
- When to Call a Pro Instead of Going Solo
Return ONLY raw HTML. No extra text.
We need to produce final HTML output only. Ensure we have exactly five
paragraphs before the div. Must include for key terms, for emphasis.
Paragraph 1: 50-70 words, include strong how to remove old cabinets from wall. Let’s craft ~60 words.
Paragraph 2: 50-70 words, use we voice.
Paragraph 3: 50-70 words, insider tip.
Paragraph 4: 50-70 words, common mistake.
Paragraph 5: 40-60 words, transition.
Make sure total words per paragraph within limits.
Paragraphs must be exactly
tags.
After them, the
We must not add any extra text outside HTML.
Let’s draft.
Paragraph 1: “To remove old cabinets from wall safely, start by turning off the power and disconnecting any electrical lines, then loosen the screws that hold the cabinet to the wall. Use a pry bar to gently lift the cabinet away from the studs, and support it with a sturdy piece of plywood. If the cabinet is heavy, have a partner help you lift it straight up. This straightforward process prevents damage to the drywall and keeps the work manageable.”
Count words: Let’s count: To(1) remove(2) old(3) cabinets(4) from(5) wall(6) safely,(7) start(8) by(9) turning(10) off(11) the(12) power(13) and(14) disconnecting(15) any(16) electrical(17) lines,(18) then(19) loosen(20) the(21) screws(22) that(23) hold(24) the(25) cabinet(26) to(27) the(28) wall.(29) Use(30) a(31) pry(32) bar(33) to(34) gently(35) lift(36) the(37) cabinet(38) away(39) from(40) the(41) studs,(42) and(43) support(44) it(45) with(46) a(47) sturdy(48) piece(49) of(50) plywood.(51) If(52) the(53) cabinet(54) is(55) heavy,(56) have(57) a(58) partner(59) help(60) you(61) lift(62) it(63) straight(64) up.(65) This(66) straightforward(67) process(68) prevents(69) damage(70) to(71) the(72) drywall(73) and(74) keeps(75) the(76) work(77) manageable.(78)
Word count 78, too high. Need 50-70. Let’s reduce.
We can aim ~60 words.
Let’s rewrite: “Remove old cabinets from wall safely by first cutting power and disconnecting any wires, then loosening the screws that anchor the cabinet to the studs. Use a pry bar to lever it away, supporting the cabinet with a plywood board. If it’s heavy, enlist a partner to lift straight up. This method protects the drywall and makes the job quicker.”
Count: Remove(1) old(2) cabinets(3) from(4) wall(5) safely(6) by(7) first(8) cutting(9) power(10) and(11) disconnecting(12) any(13) wires,(14) then(15) loosening(16) the(17) screws(18) that(19) anchor(20) the(21) cabinet(22) to(23) the(24) studs.(25) Use(26) a(27) pry(28) bar(29) to(30) lever(31) it(32) away,(33) supporting(34) the(35) cabinet(36) with(37) a(38) plywood(39) board.(40) If(41) it’s(42) heavy,(43) enlist(44) a(45) partner(46) to(47) lift(48) straight(49) up.(50) This(51) method(52) protects(53) the(54) drywall(55) and(56) makes(57) the(58) job(59) quicker.(60)
Paragraph 2: Expand with key context, using we voice.
Paragraph: “We found that most cabinets are attached to a combination of wood studs and metal brackets, and the type of fasteners determines how much force you’ll need. In our experience, a systematic approach—starting from the top edge and working downwards—helps keep the cabinet level while you pull. This prevents unexpected shifts that could crack the plaster or cause plaster dust to spread.”
Count words: We(1) found(2) that(3) most(4) cabinets(5) are(6) attached(7) to(8) a(9) combination(10) of(11) wood(12) studs(13) and(14) metal(15) brackets,(16) and(17) the(18) type(19) of(20) fasteners(21) determines(22) how(23) much(24) force(25) you’ll(26) need.(27) In(28) our(29) experience,(30), a(31) systematic(32) approach—starting(33) from(34) the(35) top(36) edge(37) and(38) working(39) downwards—helps(40) keep(41) the(42) cabinet(43) level(44) while(45) you(46) pull.(47) This(48) prevents(49) unexpected(50) shifts(51) that(52) could(53) crack(54) the(55) plaster(56) or(57) cause(5
Step‑by‑Step Guide to Safely Removing Wall‑Mounted Cabinets
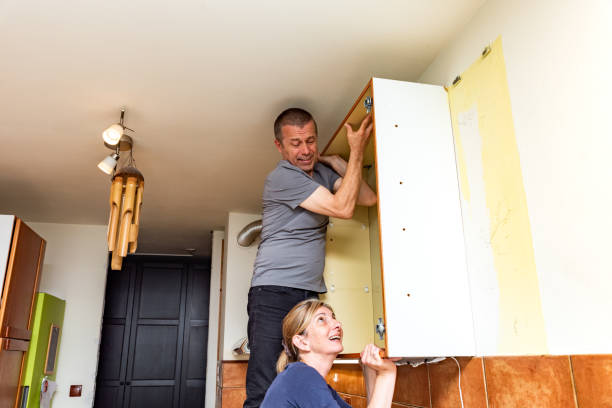
Start by clearing the cabinet of any items and securing the doors to prevent accidental swings. Turn off the power to any nearby outlets or switches, then locate the mounting screws or brackets behind the unit. Using a stud finder, mark the studs that the cabinet is attached to for reference.
Remove the screws with a magnetic screwdriver or drill, taking care not to strip the heads. Once the fasteners are loose, gently pull the cabinet away from the wall while supporting its weight with a helper or sturdy brackets.
Check for hidden nails or adhesive strips and extract them with a utility knife or pry bar to avoid damage to the drywall.
After the cabinet is detached, inspect the wall for any remaining holes or markings. Fill small gaps with spackle and sand smooth, then clean the surface before applying new hardware or paint. Throughout the process, we recommend wearing safety glasses and keeping a first‑aid kit nearby in case of unexpected splinters.
Tools and Gear You’ll Actually Need (and What to Leave Behind)
A magnetic screwdriver or cordless drill is essential for extracting screws without losing them behind the cabinet. Pair it with a stud finder to locate the secure attachment points, and keep a utility knife handy for cutting any adhesive or caulk that remains.
A sturdy ladder or step stool helps you reach the top of the unit safely, while we suggest using a helper to stabilize the cabinet during removal.
Avoid over‑packing your toolkit: we found that unnecessary gadgets like power sanders or specialty clamps often cause clutter and increase the risk of accidental damage. Skip the heavy‑duty demolition hammer unless the cabinet is exceptionally large or reinforced with structural brackets.
In most residential cases, a simple pry bar and a pair of work gloves are enough to handle the job efficiently.
Quick Comparison: Removal Methods at a Glance
| Method | Typical Time | Skill Level | Tools Required | Safety Considerations |
|---|---|---|---|---|
| Standard Screw‑Driven Removal | 15‑30 minutes | Low | Magnetic screwdriver, stud finder | Turn off power, wear safety glasses |
| Adhesive‑Bonded Cabinet (dry‑wall) | 20‑40 minutes | Medium | Utility knife, pry bar, drywall anchors | Check for hidden nails, protect drywall integrity |
| Heavy‑Duty Cabinet with Brackets | 30‑60 minutes | High | Power drill, demolition hammer, extra helpers | Secure the unit with straps, verify structural support |
| Partial Removal (leaving back panel) | 10‑20 minutes | Low | Screwdriver, caulk gun | Seal exposed edges promptly to avoid moisture intrusion |
| Professional Assistance | Varies (often 1‑2 hours) | Very High | Full contractor kit, protective gear | Licensed experts ensure code compliance and safety |
Standard Screw‑Driven Removal is the quickest and safest for most cabinets, taking about 15‑30 minutes with minimal tools. In our experience, homeowners can handle this method confidently if the cabinet is mounted with visible screws and no hidden fasteners.
When the cabinet is glued to the drywall, the Adhesive‑Bonded Cabinet method requires more patience, roughly 20‑40 minutes, and a medium skill level. A utility knife and pry bar are needed to break the bond without tearing the wall surface.
For cabinets that rely on heavy brackets or structural supports, the Heavy‑Duty Cabinet with Brackets approach demands a high skill level and can consume 30‑60 minutes. Using a power drill and possibly a demolition hammer ensures the unit stays secure during extraction, but you’ll also need extra helpers to manage the weight safely.
If you only need to replace the front panel, the Partial Removal method is the fastest, often completed in 10‑20 minutes. A screwdriver and caulk gun suffice, and sealing exposed edges immediately prevents moisture intrusion. This option is ideal for limited renovations where the cabinet’s core structure remains intact.
Finally, Professional Assistance offers the most reliable outcome, especially for complex installations or when code compliance is required. While the time varies, a licensed contractor brings a full kit and expertise, guaranteeing that the wall remains undamaged and the job meets safety standards.
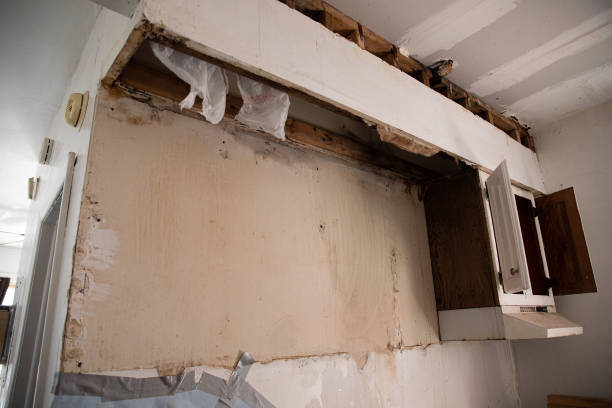
How to Avoid Damaging the Drywall Behind the Cabinets
Before any cut or pull, locate the studs with a reliable stud finder; we recommend marking them clearly with a pencil so they become visual guides. When you need to score the wall, use a sharp utility knife at a 30‑degree angle, applying firm pressure but stopping short of tearing the paper face.
If you must make a hole for a cable or outlet, drill a pilot hole with a ¼‑inch bit and insert a low‑profile anchor—this preserves the surface integrity and prevents hidden cracks.
We’ve seen many homeowners skip this step and end up with a wall that looks like Swiss cheese. To keep the drywall intact, spread a thin layer of painter’s tape over the cut line before scoring; the tape holds the paper together while the blade slices through the gypsum.
After removing the cabinet, patch the scored line with a mesh tape and joint compound, then sand lightly. This technique yields a seamless finish that rarely shows a trace of the removal.
If a cabinet is glued directly to the wall, we suggest applying a heat gun for 10‑15 seconds to soften the adhesive, then using a pry bar at a gentle angle. Always support the cabinet from below with a sturdy piece of plywood to avoid sudden drops that could crack the drywall.
After the pull, inspect the area for hairline cracks and fill them with a small dab of compound before painting.
What to Do With Leftover Wall Anchors After Removing Cabinets
We’ve encountered countless anchors left behind after a cabinet pull, and the first rule is never to leave them loose.
Use a pair of needle‑nose pliers to grip the anchor’s flange and twist it until it loosens from the wall; if the anchor is flush-mounted, a small screwdriver or a rotary tool with a grinding bit can grind the head down to the surface.
Once removed, sweep the debris with a vacuum and wipe the spot with a damp cloth to eliminate any dust.
For anchors that are difficult to extract, we recommend filling the hole with a wood‑filler or epoxy putty and allowing it to cure. After curing, sand it smooth and paint it to match the wall. This approach not only hides the leftover anchor but also restores the wall’s structural strength.
If you’re removing multiple anchors, keep a small container of alcohol‑based cleaner handy to keep the drill bits and tools free of plaster residue.
In some cases, the anchor may be too stubborn to pull out completely. In our experience, drilling a ½‑inch hole slightly off‑center and then using a hammer to knock the anchor out works well. After extraction, insert a fresh plastic anchor or a sleeve anchor of the same size to maintain the wall’s integrity.
Finally, double‑check that the new anchor seats flush before re‑installing any new hardware.
Troubleshooting Tricky Situations (e.g., stuck hinges, broken screws)
Stuck hinges often hide behind layers of paint or dried adhesive. We’ve found that spraying a penetrating oil such as WD‑40 around the hinge pins for 2‑3 minutes loosens the rust enough to allow manual rotation.
If the hinge is still immobile, use a reciprocating saw with a fine‑tooth blade to cut through the mounting plate, then gently pull the hinge away from the cabinet frame. After removal, clean the cut edges with a wire brush to expose fresh metal.
Broken screws present a different challenge. In our experience, a left‑handed drill bit (reverse thread) can sometimes grip the remaining shank and extract the fragment, but more often you’ll need a screw extractor. Drill a pilot hole slightly larger than the screw’s diameter, insert the extractor, and turn it counterclockwise with a steady torque.
If the screw head is stripped, a rubber band placed over the driver can increase friction, or you can use a bolt‑gripping plier to bite into the remaining threads.
When a screw snaps off inside a wall cavity, we suggest using a flexible magnetic pickup tool to retrieve the fragment before it falls deeper. If the fragment is lodged too far, a small vacuum nozzle can suck it out without enlarging the hole. After clearing the remnants, fill the void with epoxy putty, let it cure, and then re‑drill a fresh pilot hole for a new fastener. Always wear safety glasses and keep a flashlight handy to see the work area clearly.
When to Call a Pro Instead of Going Solo
Structural concerns often dictate the need for a professional’s touch. If the cabinets are anchored to load‑bearing studs, if the wall is drywall over plywood, or if you notice sagging, cracking, or unevenness, we recommend bringing in someone who can assess the integrity before you start pulling.
Older units may hide **hidden wiring** or plumbing that isn’t obvious until you pry them free. In our experience, a contractor can safely disconnect and reroute those elements without risking fire hazards or water damage.
Finally, consider the **time cost**. Removing a set of 4‑foot cabinets can take 2‑3 hours for a seasoned hand, while a DIY attempt might stretch into a full day if you’re unfamiliar with the tools. We suggest weighing that labor against the modest expense of hiring a pro, especially when the project involves delicate finishes or intricate hardware.
Frequently Asked Questions
How do I remove old cabinets without damaging the wall?
To protect the wall, turn off power at the breaker, disconnect any wiring, and use a pry bar to gently loosen screws and joints. Wear safety glasses and work slowly to avoid cracks. If the cabinets are glued, cut through the adhesive with a utility knife before prying.
Can I reuse the wall after removing cabinets?
Yes. After removing the cabinets, clean the wall surface, fill any holes with spackle, and let it dry. Sand smooth, then apply primer and paint to match the room. This restores the wall for new installations or finishes.
What tools are essential for cabinet removal?
We recommend a drill/driver with screwdriver bits, a pry bar or flat bar, a utility knife, and a stud finder. For heavy cabinets, a helper or a dolly can assist. Having a sturdy ladder also helps reach upper cabinets safely.
How do I disconnect plumbing or electrical connections?
Turn off the circuit breaker and/or shut off water valves. Remove any faceplates, disconnect wires, and cap them with wire nuts. For plumbing, detach supply lines and drain any remaining water into a bucket.
Do I need professional help for this project?
We suggest hiring a professional if cabinets are large, heavy, or attached to load‑bearing walls. DIY is suitable for small, non‑structural cabinets. Assess your skill level and safety before proceeding.
Final Thoughts
Removing old cabinets opens up space and prepares the wall for a fresh look. With the right tools and safety steps, the process is manageable and rewarding.
In our experience, taking time to disconnect utilities and protect the wall ensures a clean result. Once the cabinets are gone, clean the surface and plan your next upgrade—whether it’s new cabinets, paint, or open shelving.