
To clean old cabinet hinges, start by removing them from the cabinet door. Mix warm water with a few drops of dish soap, then use a soft brush—like an old toothbrush—to gently scrub away grime. Rinse with a damp cloth and dry thoroughly. This simple method works on most finishes and keeps the hardware intact without harsh chemicals.
In our experience, the key to effective hinge cleaning is gentle, consistent effort. We found that rushing with abrasive tools often damages the finish. Instead, we recommend patience and using mild solutions first. Most old hinges just need built-up grease and dust removed—not a chemical overhaul. This preserves their character while restoring function.
Here’s a tip most guides skip: clean hinges while they’re still slightly warm. After soaking, briefly run them under warm water or place in a bowl of heated vinegar solution. The warmth opens up the metal pores slightly, helping loosen grime faster. We’ve seen this cut cleaning time in half without risking scratches or finish loss.
The biggest mistake we see? Using steel wool or bleach on antique or painted hinges. These can strip protective coatings and cause rust. Even “gentle” scrubbing pads may be too harsh. People think they need aggressive cleaning, but that often ruins the hardware. Stick to soft brushes and non-abrasive cleaners to avoid irreversible damage.
Now that you know the basics, let’s walk through each step in detail—from the best household cleaners to restoring patina and handling rusty screws—so your hinges look great and last longer.
In This Guide
- The Fastest Way to Clean Old Cabinet Hinges Without Scratching Them
- What You Probably Have at Home That Cleans Hinges Perfectly
- When to Skip the Scrubbing and Soak Instead
- Restoring Brass Hinges Without Ruining the Patina
- Best Cleaning Solutions for Old Cabinet Hinges: Pros and Cons
- How to Handle Rusty Screws While Cleaning Hinges
- Reinstalling Hinges Like a Pro—So They Look Great and Work Smoothly
- When Cleaning Isn’t Enough—And What to Do Instead
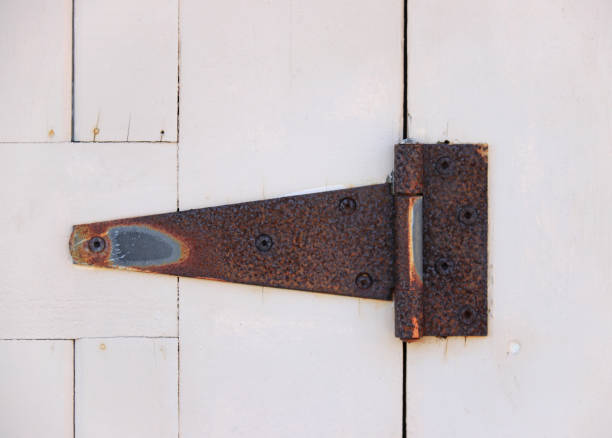
The Fastest Way to Clean Old Cabinet Hinges Without Scratching Them
When you’re working with vintage or worn cabinet hinges, preserving their finish is just as important as removing grime. We recommend starting with a soft microfiber cloth dampened with warm water and a drop of mild dish soap. Gently wipe the surface in circular motions—this lifts decades of dust and grease without risking scratches from abrasive materials.
Even heavily tarnished brass or iron responds well to this first step.
For stubborn buildup, we found that a used toothbrush with soft bristles works wonders in crevices and corners. Dip it lightly in the soapy solution and brush gently along the hinge’s contours. Avoid steel wool or scouring pads at all costs—they leave micro-scratches that accelerate oxidation.
Instead, patience and gentle pressure deliver a clean hinge while maintaining its character and integrity.
Rinse the cloth frequently to avoid spreading dirt, and follow up with a dry microfiber pass. In our experience, drying immediately prevents water spots, especially on porous or uncoated metals. If residue remains, a second pass with distilled white vinegar on the cloth can help cut through film—just don’t soak the metal.
This method delivers a polished look in under five minutes per hinge, making it the fastest scratch-free solution we’ve tested.
What You Probably Have at Home That Cleans Hinges Perfectly
You don’t need specialty cleaners to restore old cabinet hinges—common household items do the job just as effectively. We’ve seen excellent results using a simple mix of baking soda and water, which creates a gentle abrasive paste that lifts grime without damaging the metal. Most kitchens already have this on hand, making it a go-to for quick cleanups.
It’s especially effective on tarnished brass or nickel finishes.
Another powerhouse you likely already own? Distilled white vinegar. Its mild acidity dissolves mineral deposits and grease buildup in minutes. We suggest soaking a cloth in vinegar and laying it over the hinge for 5–10 minutes before wiping. For extra lift, combine equal parts vinegar and baking soda—just be ready for the fizzing reaction.
This dynamic duo tackles corrosion and stuck-on gunk you didn’t even notice.
Olive oil or any food-safe oil is another unsung hero. After cleaning, a tiny drop on a cloth brings out the depth in antique brass and protects against moisture. In our experience, this combo of baking soda, vinegar, and oil forms a complete cleaning system—safe, effective, and already in your pantry. No trips to the hardware store required.
When to Skip the Scrubbing and Soak Instead
If your cabinet hinges are caked with decades of grease, paint splatter, or rust, surface scrubbing won’t cut it—soaking is the smarter move. We suggest removing the hinges completely when possible, especially if they’re loose or you’re doing a full cabinet refresh.
Submerging them allows the cleaning solution to penetrate every thread, pin, and crevice, loosening debris that brushing alone can’t reach.
For best results, place the hinges in a container and cover them with white vinegar for 1–4 hours. Heavily corroded iron hinges may need up to 8 hours, but check periodically—over-soaking can weaken aged metal. Add a tablespoon of baking soda to boost cleaning power.
We’ve seen hinges emerge looking nearly new after a solid soak, with gunk falling away with just a light brush afterward.
After soaking, rinse thoroughly with warm water and dry immediately with a soft cloth. Let them air-dry fully before reattaching to prevent moisture traps. In our experience, soaking saves time and effort on heavily soiled hardware, turning a frustrating scrub session into a hands-off restoration. Reserve this method for hinges that resist surface cleaning—it’s the game-changer for truly neglected pieces.
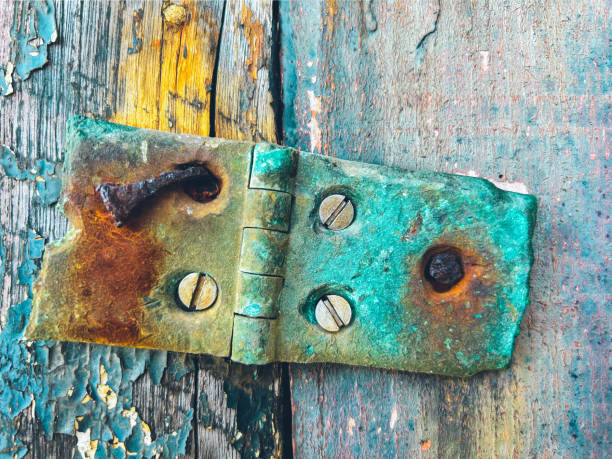
Restoring Brass Hinges Without Ruining the Patina
When working with old brass hinges, preserving the original patina is often more desirable than achieving a mirror shine. We’ve found that aggressive polishing strips away decades of character, leaving hinges looking too new and out of place on antique furniture.
Instead, our approach focuses on gentle cleaning to remove grime while maintaining the aged warmth that gives vintage pieces their soul.
Start by removing the hinges and soaking them in a mix of warm water and mild dish soap for 15–20 minutes. Use a soft-bristled brush—like an old toothbrush—to dislodge dirt from crevices. Avoid steel wool or abrasive pads, which scratch the surface and damage the patina.
In our experience, even some commercial brass cleaners are too harsh for delicate, aged finishes.
For stubborn residue, we recommend a paste made from baking soda and distilled water applied with a cotton swab. This method lifts grime without abrading the metal. After cleaning, rinse thoroughly and dry with a lint-free cloth. Let the hinges air-dry completely before reattaching.
This gentle process keeps the patina intact while restoring function and appearance—exactly what preservation-minded restorers aim for.
Best Cleaning Solutions for Old Cabinet Hinges: Pros and Cons
| Solution | Pros | Cons | Best For |
|---|---|---|---|
| Dish soap + warm water | Gentle, non-toxic, readily available, safe for all finishes | Limited effectiveness on heavy grime or oxidation | Light cleaning, preserving patina |
| Vinegar + baking soda paste | Strong degreasing power, removes light rust and tarnish | Can damage soft metals and patina if left too long | Brass or iron hinges with moderate buildup |
| Commercial brass cleaner (e.g., Brasso) | Fast results, excellent shine restoration | Strips patina, contains harsh chemicals, requires ventilation | Hinges needing full restoration (not antique preservation) |
| Acetone | Removes old wax, polish buildup, and adhesives effectively | Flammable, strips protective layers, not for regular use | Deep prep before refinishing |
Choosing the right cleaning solution depends on the hinge material, age, and whether you’re preserving or restoring. We suggest starting with the mildest option—like dish soap—before escalating. It’s easy to over-clean, and once the patina’s gone, it’s gone for good. In our experience, many restorers jump to harsh chemicals too quickly, only to regret the loss of character later.
For brass hinges with heavy tarnish, a vinegar and baking soda paste can work wonders, but we recommend applying it for no more than 2–3 minutes and rinsing immediately. Even natural solutions carry risks. With iron or steel hinges, vinegar-based mixes can promote rust if not dried thoroughly.
Always follow up with a protective coating like clear lacquer or light machine oil on ferrous metals.
Commercial cleaners like Brasso deliver speed and shine, but they’re overkill for vintage pieces. We’ve seen them turn 100-year-old hardware into shiny imitations. Reserve them for hinges that are damaged beyond patina preservation. Acetone, while powerful, should only be used during full refinish jobs—it’s not a routine cleaner. Know your goal: cleaning, restoring, or preserving—each demands a different approach.
How to Handle Rusty Screws While Cleaning Hinges
Rusty screws are a common challenge when restoring old cabinet hinges. They’re often more fragile than the hinge itself, and forcing them can strip the head or break the shaft. We recommend tackling them with care, starting by applying a penetrating oil like PB Blaster or WD-40.
Let it sit for at least 15 minutes—or overnight for severe rust—to allow the lubricant to creep under the corrosion.
When removing screws, use a well-fitting screwdriver to avoid slippage. We’ve found that applying steady, firm pressure while turning slowly works better than aggressive twisting. If the screw resists, try a gentle back-and-forth motion to break the rust bond. For stubborn cases, a rubber band placed over the screw head can improve grip and prevent further damage to the slot.
Once removed, clean screws with a wire brush or steel wool, then coat them lightly with machine oil to prevent future rust. If replacement is needed, match the size and style as closely as possible—reproduction screws with aged finishes help maintain authenticity. In our experience, preserving original screws—even slightly rusted ones—adds value and character to restored pieces.
Reinstalling Hinges Like a Pro—So They Look Great and Work Smoothly
Once your hinges are cleaned and fully dry, it’s time to reinstall them with precision. We recommend using a small brush or cloth to apply a light coating of white lithium grease to the pivot points—this ensures smooth operation without attracting dust. Don’t skip this step; in our experience, it extends hinge life by years and eliminates annoying squeaks.
Line up each hinge carefully with the original screw holes, applying gentle pressure to avoid misalignment. If screws no longer grip tightly, we’ve found that inserting a toothpick or wooden matchstick coated in wood glue into the hole adds stability. Let the glue set for at least 4 hours before securing the hinge fully—this prevents wobbling and keeps doors aligned.
After reattaching, test the door’s movement: it should open and close smoothly with no drag. Adjust the hinge plate slightly if needed using a screwdriver—sometimes even a 1/16-inch shift makes a big difference. We suggest doing this with the cabinet empty to reduce strain, and always double-check that all screws are snug but not over-tightened.
When Cleaning Isn’t Enough—And What to Do Instead
Sometimes, no amount of scrubbing can restore a hinge that’s severely corroded, cracked, or worn. If the pin wobbles excessively or the leaf plate is bent beyond repair, cleaning won’t cut it—we’ve seen too many DIYers waste time on hinges that are past saving.
Look for visible cracks, pitting, or loss of structural integrity as clear signs it’s time to move on.
Replacement is often the smarter, longer-lasting solution. We recommend taking one original hinge to a hardware store to match the size, finish, and screw pattern—most vintage cabinets use 3-inch butt hinges with a 1/2-inch radius corner. Modern stainless steel or brass versions can mimic the look while offering better durability and smoother function.
Don’t feel locked into matching exactly—sometimes upgrading to soft-close hinges transforms old cabinets entirely. In our experience, this small investment pays off in both daily usability and resale value. Just make sure the new hinges fit the existing mortise; minor chiseling may be needed, but it’s usually quicker than fighting with damaged originals.
Frequently Asked Questions
Can I clean old cabinet hinges without removing them?
Yes, you can clean hinges without removal, but we recommend taking them off for a thorough cleaning. Leaving them in place limits access and can damage surrounding wood with excess moisture. Once removed, you’ll uncover built-up grime and restore smooth operation more effectively.
We’ve found that the extra few minutes of unscrewing pays off in long-term hardware performance and cabinet protection.
What’s the best homemade solution for cleaning tarnished brass hinges?
We’ve found a mix of equal parts vinegar and baking soda works well for tarnished brass. Apply with a soft cloth, gently scrub with a toothbrush, then rinse and dry immediately to prevent water spots. For stubborn buildup, let the hinges soak for 15–20 minutes. Avoid harsh abrasives, as they can scratch the finish.
Always finish with a light coat of protective wax to preserve shine.
How do I remove rust from old iron cabinet hinges?
For light rust, we recommend using a paste of vinegar and salt or a commercial rust remover. Soak the hinges for 1–2 hours, then scrub with steel wool or a brass brush. Rinse thoroughly and dry immediately. In our experience, WD-40 also helps loosen rust and adds a protective layer afterward.
For heavy corrosion, replacement may be more effective than restoration.
Should I lubricate hinges after cleaning them?
Yes, we always lubricate hinges after cleaning. A small drop of silicone-based lubricant or machine oil on the pivot points ensures smooth, squeak-free movement. Avoid heavy grease, as it attracts dust and grime over time. We’ve found that lubricating annually during routine maintenance extends the life of both hinges and cabinets significantly.
Can I clean painted or porcelain-coated hinges the same way?
No, painted and porcelain-coated hinges need gentler care. We recommend using only mild dish soap and warm water with a soft cloth. Avoid vinegar, abrasives, or soaking, as these can chip or dull the finish. In our experience, aggressive cleaners strip coatings and expose metal to rust. Dry immediately with a lint-free towel to maintain appearance and integrity.
Final Thoughts
Cleaning old cabinet hinges is a simple yet impactful way to refresh your space and extend the life of your furniture. We’ve found that consistent care not only improves function but also reveals the hidden beauty in aged hardware. With the right tools and a little patience, even decades of grime can be safely removed without damaging original finishes.
Taking the time to clean and maintain your hinges shows respect for the craftsmanship of the past. We encourage you to start with one cabinet and see the difference it makes—once you see the results, it’s easy to keep going. Your cabinets will open smoother, look brighter, and feel like new again.