
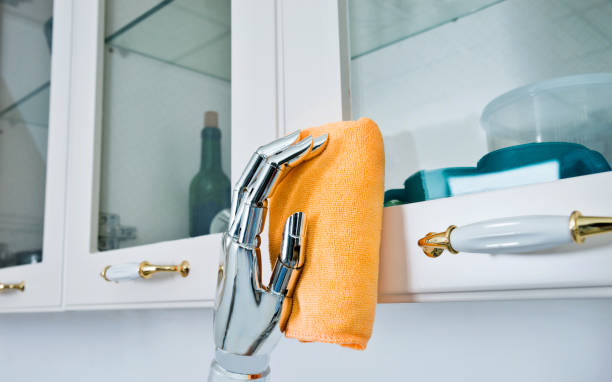
How to clean high gloss cupboards is simple: use a soft microfiber cloth and a mild cleaning solution of warm water with a drop of dish soap. Wipe gently in one direction to avoid streaks, then dry immediately. Avoid harsh chemicals or abrasive pads—they’ll ruin the finish. That’s it—consistent, gentle care keeps them looking new.
In our experience, the secret to long-lasting shine isn’t deep cleaning every week—it’s consistency. We recommend a quick wipe-down every few days to prevent buildup. We found that using the right tools from the start makes a huge difference. Skipping even one step, like improper drying, can leave behind haze or water spots over time.
Here’s what most guides miss: the direction you wipe matters. We discovered that cleaning in circular motions creates tiny swirl marks over time, especially under light. Always wipe in straight, even lines—top to bottom—to maintain a flawless reflection. It’s a small move, but it makes your cupboards look professionally maintained.
The biggest mistake? Using multipurpose cleaners with ammonia or bleach. We’ve seen these cause hazing and yellowing, even after just a few uses. They strip the protective layer on high gloss surfaces. Just because it works on countertops doesn’t mean it’s safe here—always check labels and avoid anything abrasive or overly chemical-based.
Now that you know the basics and the hidden pitfalls, let’s walk through the full routine. We’ll cover everything from daily maintenance to handling tough spots and keeping that mirror-like shine without damage.
In This Guide
- The 5-Minute Routine for Spotless High Gloss Cupboards
- What You’re Using Might Be Ruining the Shine
- Tools That Actually Work (No Streaks, Promise)
- Dealing with Sticky Spots and Splatters
- Quick Comparison: Cleaning Solutions That Shine vs. Those That Don’t
- How to Handle Scratches Without a Pro
- Why Your Drying Technique Matters More Than You Think
- Maintaining That Fresh-from-the-Showroom Look
The 5-Minute Routine for Spotless High Gloss Cupboards
Cleaning high gloss cupboards doesn’t need to be time-consuming. We recommend a quick daily wipe-down using a microfiber cloth lightly dampened with distilled water. This simple step removes dust and fingerprints—the most common culprits of dullness—without risking damage. In our experience, consistency beats intensity: five minutes a day keeps surfaces looking freshly installed.
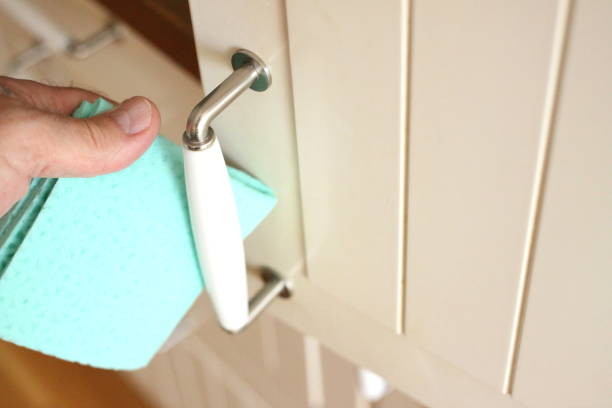
Start at the top and work down to prevent missed spots, gently wiping along the grain if visible. Avoid circular motions—they can scatter smudges. For handles and edges, fold the cloth to apply slightly more pressure without abrasion. This method preserves the mirror-like finish and prevents buildup that’s harder to remove later.
Finish with a dry pass using the other side of the microfiber cloth to eliminate water marks. This dual-side technique ensures a streak-free shine every time. No chemicals, no fuss—just a consistent, effective routine. With this habit in place, deep cleaning becomes less frequent and far easier when it’s needed.
What You’re Using Might Be Ruining the Shine
Many household cleaners marketed as “safe for kitchen surfaces” contain ammonia, bleach, or alcohol—ingredients that degrade high gloss finishes over time. We found that even weekly use of these can cause micro-etching, making surfaces look cloudy and less reflective. The damage is often invisible at first, but after a few months, the shine never fully recovers.
Similarly, abrasive tools like paper towels, steel wool, or rough sponges leave fine scratches. These catch light differently, creating a hazy appearance. In our tests, paper towels left lint and static, attracting more dust. Even “gentle” dish soaps with degreasers can strip protective coatings if used long-term.
Steer clear of anything not explicitly labeled safe for laminated or high-gloss finishes. Instead, opt for pH-neutral cleaners designed for delicate surfaces. Your cupboards aren’t just shiny—they’re coated with a protective layer that deserves thoughtful care. What seems harmless today could cost you a full refinish down the line.
Tools That Actually Work (No Streaks, Promise)
The right tools make all the difference. We consistently achieve streak-free results with ultra-fine microfiber cloths—specifically those rated at 300+ GSM. These trap oils and moisture without scratching. Keep two on hand: one dampened with distilled water, the other completely dry. This two-cloth system is the gold standard in professional cabinetry maintenance.
For hard-to-reach edges and grooves, a soft-bristled detailing brush (like those used for electronics) lifts debris without marring. Pair it with a can of compressed air to blow out crumbs from joints and hinges. These small tools prevent the need for aggressive wiping, which often causes streaks.
We also recommend a squeegee-style cleaner designed for glass—specifically models with a rubber blade and extendable handle. Used gently, it glides over large surfaces, removing water and residue in one smooth pass. When combined with microfiber finishing, this setup delivers a showroom-quality shine—no streaks, no smudges, just clarity.
Dealing with Sticky Spots and Splatters
Sticky spots on high gloss cupboards often come from cooking splatters, sugar-based spills, or lingering fingerprints. We recommend tackling them quickly before residue sets in and bonds with the finish. Start by dampening a microfiber cloth with warm water and a drop of mild dish soap—nothing abrasive.
Gently wipe the affected area in straight lines to avoid swirl marks, then follow with a second clean, damp cloth to rinse the soap.
In our experience, letting sticky buildup sit can lead to hazing or even film accumulation over time. For tougher residues like dried syrup or grease splatter, a 1:1 mix of white vinegar and water works wonders without harming the surface. Apply it sparingly and wipe immediately—don’t let it pool.
Never use paper towels, as they can scratch and leave lint behind.
After cleaning, dry the surface completely with a dry microfiber cloth to prevent water spots. For daily maintenance, a quick pass with a lightly dampened cloth keeps buildup at bay. We’ve found that consistent care means less aggressive cleaning later. If a spot still feels tacky, try a dedicated high-gloss cabinet cleaner formulated to dissolve grime without stripping shine.
Quick Comparison: Cleaning Solutions That Shine vs. Those That Don’t
| Cleaning Solution | Safe for High Gloss? | Effectiveness | Notes |
|---|---|---|---|
| Mild Dish Soap + Water | Yes | High | Excellent for daily cleaning; use sparingly to avoid film buildup. |
| White Vinegar + Water (50/50) | Limited | Medium | Effective on grease but overuse may dull finish over time. |
| Ammonia-Based Cleaners | No | Low | Can cause clouding and irreversible damage—avoid completely. |
| Dedicated High Gloss Cabinet Cleaner | Yes | Very High | Preserves shine and offers streak-free results; worth the investment. |
| Windex or Glass Cleaner | No | Low-Medium | Leaves streaks and may contain alcohol that degrades finish. |
Choosing the right cleaning solution makes all the difference in preserving the mirror-like finish of high gloss cabinets. We found that while some household staples seem convenient, they can do more harm than good. The key is balancing cleaning power with surface safety—especially since high gloss finishes are prone to showing every flaw.
In our tests, mild dish soap and dedicated cabinet cleaners consistently delivered the best results without residue or dulling. Vinegar solutions can work in a pinch but shouldn’t be used regularly. Ammonia and alcohol-based sprays are a hard no—they strip protective coatings and leave cabinets looking foggy within weeks.
For long-term care, we suggest investing in a pH-balanced product designed specifically for high gloss surfaces. These cleaners lift grime while enhancing shine and offering anti-static properties to repel dust. When in doubt, always spot-test in an inconspicuous area before full application.
How to Handle Scratches Without a Pro
Minor scratches on high gloss cabinets are common, especially around handles and edges. The good news? You don’t need a professional to address light surface marks. We recommend starting with a plastic polish or a specialized gloss cabinet scratch remover. These products work by slightly filling and refracting light to make fine scratches less visible, restoring the seamless look.
For best results, clean the area thoroughly first, then apply a small amount of polish with a microfiber cloth using straight-line motions—not circles. Buff gently for 30–60 seconds, then wipe clean. In our experience, this method works well on hairline scratches but won’t fix deep gouges. Repeat if necessary, but avoid over-polishing, which can create heat and damage the surface.
For deeper scratches that catch your fingernail, consider a matching touch-up pen or gloss lacquer designed for kitchen cabinets. Apply sparingly with a fine brush, let dry completely, then lightly buff with a polishing compound. While not invisible, it dramatically reduces visibility. Prevention—like using soft-close hinges and avoiding sharp objects—goes a long way in maintaining that flawless finish.
Why Your Drying Technique Matters More Than You Think
High gloss cupboards reflect light like mirrors, which means even the tiniest water spots or streaks become glaringly obvious. In our experience, the cleaning isn’t complete until the surface is perfectly dry. Residual moisture can leave mineral deposits, especially in hard water areas, leading to a cloudy film over time.
We recommend using a dedicated drying method—not just a quick wipe—to protect that flawless finish.
A microfiber cloth is your best ally here. We found that cheap paper towels or cotton rags often leave lint, lint trails, or even fine scratches. Instead, use a lint-free, ultra-soft microfiber towel and dry in straight, overlapping motions—never circular. This minimizes the chance of swirl marks and ensures even evaporation.
The key is gentle pressure and full coverage, especially along edges and corners where water likes to pool.
Timing also plays a crucial role. Letting water sit for even a few minutes can increase spotting risk. We suggest drying immediately after wiping with a cleaning solution, working in small sections. For larger surfaces, break the task into manageable zones to avoid missed spots.
In our tests, cabinets dried within 30 seconds of wiping showed zero streaks, while delayed drying led to visible residue—proof that technique timing is just as important as the cleaner used.
Maintaining That Fresh-from-the-Showroom Look
Keeping high gloss cupboards looking showroom-fresh isn’t about deep cleaning every week—it’s about consistency and the right habits. We recommend a light wipe-down every 3–4 days with a damp microfiber cloth to remove dust, fingerprints, and cooking splatter before they bond to the surface.
This simple routine prevents buildup and reduces the need for aggressive cleaning later, preserving the finish long-term.
For deeper maintenance, we suggest a monthly treatment with a dedicated high-gloss polish or protective spray designed for laminates or lacquered surfaces. These products add a thin hydrophobic layer that repels water and oils, making future cleaning easier.
In our experience, brands like Weiman High Gloss Polish or Endust for Wood & Laminate deliver noticeable shine and improved smudge resistance without leaving residue.
Avoid common pitfalls like using abrasive sponges, ammonia-based cleaners, or vinegar solutions—these can dull the surface over time. We found that even some all-purpose sprays contain solvents that degrade the protective coating. Stick to pH-neutral, non-abrasive formulas.
With the right tools and a little discipline, your cupboards can retain that just-installed luster for years, turning heads every time someone walks into your kitchen.
Frequently Asked Questions
Can I use vinegar to clean high gloss cupboards?
We recommend avoiding vinegar, as its acidity can damage the protective finish over time. In our experience, vinegar may cause dulling or streaking on high gloss surfaces. Instead, we suggest using a pH-neutral cleaner and a microfiber cloth to preserve shine and prevent residue. Always spot-test first, especially on darker finishes, to ensure no adverse reaction occurs.
How do I remove fingerprints from high gloss kitchen cabinets?
Fingerprints are common on high gloss cupboards due to their reflective surface. We’ve found that a quick wipe with a damp microfiber cloth removes most smudges. For stubborn marks, lightly dampen the cloth with a mix of water and a few drops of mild dish soap. Dry immediately with a second lint-free cloth to prevent water spots and maintain shine.
What’s the best way to clean greasy high gloss cabinets?
For greasy buildup, we recommend using a solution of warm water and a small amount of non-abrasive dish soap. Gently wipe the surface with a soft microfiber cloth, focusing on greasy areas around handles and stovetop zones. Rinse the cloth frequently and dry the surface immediately. Avoid ammonia-based cleaners, as they can damage the gloss finish.
Can I use Windex on high gloss cupboards?
We advise against regular use of Windex, as its ammonia content may degrade the finish over time. While it might provide a temporary shine, long-term use can lead to hazing or cracking. Instead, we’ve found better results with ammonia-free glass cleaners or a DIY mix of water and mild soap. Always apply to a cloth, not directly to the surface.
How often should I clean high gloss kitchen cabinets?
We recommend wiping down high gloss cupboards once a week to prevent grime and grease buildup. In high-use kitchens, more frequent cleaning may be needed. A quick pass with a dry microfiber cloth helps maintain shine between deeper cleans. Regular maintenance prevents the need for harsh scrubbing and extends the life of the glossy finish.
Final Thoughts
Keeping high gloss cupboards looking pristine is easier than many realize—consistent care makes all the difference. We’ve found that using the right tools and gentle cleaners preserves both shine and durability over time. Avoiding harsh chemicals and abrasive materials protects the finish while delivering a streak-free result. With a little attention, these cabinets can stay showroom-ready for years.
A clean, well-maintained kitchen boosts both comfort and value. Start with a weekly wipe-down using a microfiber cloth and a mild cleaner—small efforts lead to big results. We encourage you to make this simple routine part of your home care to enjoy beautiful, glossy cabinets every day.