
Looking for pantry set up ideas that actually work? It’s not just about matching bins or fancy labels—it’s about creating a system that makes cooking easier and reduces food waste. We focused on solutions that are practical, affordable, and tailored to real-life kitchens, not just picture-perfect shelves.
In our experience, the best pantries balance looks and function. We found that small changes—like grouping by meal type instead of food category—can save time and reduce stress. We recommend starting simple: empty everything, assess what you use, then build a layout that fits your routine, not someone else’s Instagram grid.
Here’s a tip most guides miss: store your most-used items at eye level, even if they’re not “pretty”. That bag of rice you cook every week? Keep it front and center. We’ve learned that accessibility beats aesthetics every time when you’re hungry and short on time.
The biggest mistake we see? Believing you need to buy containers before organizing. Not true. Many people waste money on matching jars only to realize they don’t fit on their shelves or don’t suit their habits. Focus on usage patterns first—containers second.
Ready to build a pantry that works for you? Below, we break down smart, no-fuss strategies that fit real kitchens and real lives.
In This Guide
- How to Set Up a Pantry That Works (Not Just Looks Good)
- Clear Containers vs. Original Packaging: What’s Worth the Switch?
- The Lazy Cook’s Guide to Pantry Organization
- Where to Store Spices (Hint: Not Above the Stove)
- Pantry Set Up Ideas for Tiny Spaces
- Labels That Don’t Scream ‘Pinterest Fail’
- What to Do When Your Pantry Doubles as a Cleaning Closet
How to Set Up a Pantry That Works (Not Just Looks Good)
Let’s be honest—most pantry inspiration we see online looks stunning, but it’s not always practical for daily life. We recommend starting with a full empty-out, sorting items into categories like grains, canned goods, snacks, and baking supplies. This step helps you assess what you actually own and identify duplicates or expired items.
In our experience, a pantry that works begins with honest usage patterns, not aesthetics.
Next, consider your cooking habits. If you make oatmeal every morning, keep oats within easy reach—don’t tuck them on a high shelf. We suggest using tiered shelves for visibility and pull-out bins for deeper cabinets. Grouping similar items together reduces decision fatigue and speeds up meal prep. Remember, function beats symmetry when you’re juggling groceries and hungry kids.
Finally, label everything—even if you think you’ll remember. Over time, even the most organized systems degrade without maintenance. We found that assigning zones (like a “breakfast corner” or “pasta zone”) helps everyone in the household stay consistent. Reassess every 3 months: toss expired goods, regroup categories, and tweak storage based on seasonal changes.
A pantry that works evolves with your life, not just matches your kitchen’s color scheme.
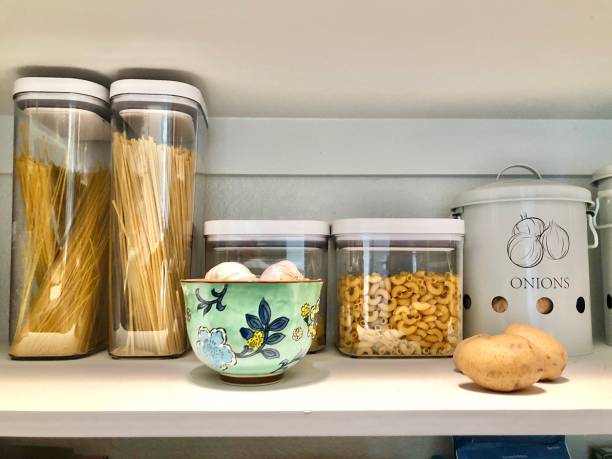
Clear Containers vs. Original Packaging: What’s Worth the Switch?
| Item Type | Keep in Original Packaging? | Switch to Clear Container? | Notes |
|---|---|---|---|
| Pasta & Rice | No | Yes | Original boxes crush easily; clear, airtight containers preserve freshness and stack well. We recommend square containers for better space use. |
| Canned Goods | Yes | No | Cans are already durable and labeled. We suggest grouping them by type (beans, tomatoes, soups) instead of transferring. |
| Baking Supplies (flour, sugar) | No | Yes | Original bags tear and attract pests. Airtight containers prevent moisture and make measuring easier. We found wide-mouth jars best for scooping. |
| Snacks (chips, cookies) | Yes (short-term) | Yes (bulk/opened) | Unopened bags stay sealed. Once opened, transfer to containers to keep crispness. Kids love grabbing snacks from clear bins. |
When deciding between original packaging and clear containers, it’s not one-size-fits-all. Some items lose nothing by staying in their box, while others benefit greatly from a transfer. We suggest evaluating based on shelf life, stackability, and accessibility. For example, a crumpled cereal bag buried behind cans is a mealtime headache waiting to happen.
In our experience, the real value of clear containers comes from visibility and consistency. Seeing exactly how much brown rice or quinoa remains helps with meal planning and reduces overbuying. We found that uniform containers create rhythm in the pantry—everything feels intentional. But don’t go overboard: if the original packaging is sturdy and resealable, it might not need replacing.
Also consider cost and storage. Buying a full set of containers adds up, and they take up space when empty. We recommend starting with high-use items like flour, sugar, and pasta. Use labeling with dates to track freshness. Over time, you’ll learn what’s worth the switch and what’s just pantry theater. Practicality always wins.
The Lazy Cook’s Guide to Pantry Organization

You don’t need perfect rows of matching jars to have a functional pantry—just smart, low-effort systems. We recommend the “most used, most visible” rule: store everyday items like olive oil, canned tomatoes, and pasta at eye level and within arm’s reach. Less-used spices or holiday baking supplies? Stick them on the top shelf.
This minimizes effort when you’re tired or short on time.
Lazy doesn’t mean messy. We suggest using over-the-door racks and stackable bins to double your space without reorganizing weekly. Group similar items in bins labeled “Soups,” “Emergency Snacks,” or “Quick Meals.” When everything has a home, putting things away takes seconds. In our experience, the fewer decisions you make, the more likely you’ll stick with the system.
Finally, embrace “good enough” organization. We found that pantries stay tidy when they’re easy to maintain. Do a 5-minute weekly sweep: return misplaced items, toss expired goods, and wipe spills. No deep cleaning required. The goal isn’t Pinterest perfection—it’s getting dinner on the table with less stress and fewer “where’s the rice?” moments. Work smarter, not harder.
Where to Store Spices (Hint: Not Above the Stove)
Storing spices above the stove is a common habit, but heat and humidity are their worst enemies. We found that exposure to high temperatures degrades flavor compounds quickly—some studies suggest potency drops by up to 50% in just six months. That prime spot might seem convenient, but it’s slowly turning your turmeric and smoked paprika into flavorless dust.
Instead, we recommend a cool, dark cabinet away from appliances—like one near your prep area but not beside the oven or dishwasher. Drawer inserts with labeled slots keep spices organized and within reach. For frequent users, a countertop carousel in a shaded zone works well, as long as it’s not in direct sunlight or near steam sources.
For optimal freshness, store spices in airtight glass or metal containers and keep whole spices when possible—they last longer than ground. We suggest buying smaller quantities more often and rotating stock using the “first in, first out” rule. With proper storage, shelf life can extend to 2–3 years for whole spices and 1–2 for ground.
Pantry Set Up Ideas for Tiny Spaces
When square footage is tight, every inch counts—especially in micro-kitchens or studio apartments. We’ve seen clever solutions like stacking under-shelf wire baskets to double vertical storage in cabinets just 12 inches deep. These hold small jars or spice packs without blocking access to back items, making even a broom-closet pantry functional.
Over-the-door organizers aren’t just for cleaning supplies—clear pocket holders work brilliantly for snacks, tea bags, or single-serve condiments. We recommend models with reinforced edges that can handle 2–3 pounds per pocket. Pair this with stackable, slim-profile bins in matching heights to create uniform rows that maximize depth.
Don’t overlook the power of the wall: installing a single floating shelf with under-shelf hooks adds open storage and hanging space. Magnetic strips for spice tins or small baskets free up shelf real estate. In our experience, combining just three of these hacks can increase usable storage by up to 40% in spaces under 15 square feet.
Labels That Don’t Scream ‘Pinterest Fail’
Perfectly calligraphed labels look stunning online, but in real life, they often peel, fade, or look mismatched after a few weeks. We suggest skipping the hand-lettered approach unless you enjoy constant upkeep. Instead, laser-printed labels on matte vinyl offer durability and consistency—even in humid environments like pantries near dishwashers.
For a clean, professional look that still feels personal, we recommend using a consistent font and size—like Helvetica Bold at 14 pt—for all containers. Include key details: item name, purchase date, and expiration if applicable. This makes rotation easier and reduces food waste, which we’ve found can drop by nearly 20% with clear labeling.
Chalkboard labels are trendy but smudge easily; if you prefer them, opt for ones with a protective laminate coating. Alternatively, a $30 handheld label maker with water-resistant tape delivers crisp, uniform results. In our experience, consistency matters more than creativity—uniformity is calming, functional, and far more sustainable long-term.
What to Do When Your Pantry Doubles as a Cleaning Closet
When cleaning supplies take over your pantry, safety and organization quickly become top priorities. We recommend creating a dedicated zone—ideally on lower or higher shelves, away from food—to prevent cross-contamination. Clear, labeled bins help separate all-purpose cleaners, sponges, and trash bags from snacks or baking staples.
In our experience, a simple “cleaning caddy” on a shelf makes it easy to corral sprays, wipes, and gloves in one moveable unit.
It’s critical to store chemicals in their original containers with intact labels—never in old food jars, even if you think you’ll remember. We found that using lockable bins or opaque stackable containers not only hides unsightly bottles but also protects curious kids or pets. For maximum clarity, apply color-coded labels: red for bathroom, blue for kitchen, green for multi-surface.
This small step reduces mistakes and speeds up restocking.
If space is tight, consider a door-mounted rack or over-the-shelf baskets to free up shelf real estate. We suggest keeping only high-use items like dish soap, paper towels, and disinfectant wipes in the pantry; bulk refills can live in the garage or basement. Separation doesn’t require a remodel—just smart zoning and consistent labeling.
With a few strategic swaps, your pantry can stay food-safe and fully functional.
Frequently Asked Questions
How do I start organizing a messy pantry?
We recommend starting by completely emptying the pantry and sorting items into categories. Wipe down shelves, then group similar items like canned goods, grains, and snacks. Use clear airtight containers for dry goods and label everything. We’ve found that placing frequently used items at eye level keeps your system practical and sustainable.
What are the best containers for a pantry?
In our experience, glass or BPA-free plastic containers with airtight seals work best for preserving freshness. We recommend square or rectangular ones—they maximize shelf space better than round containers. Look for stackable designs and include labels with contents and expiration dates. These choices keep food organized, visible, and protected from pests and moisture.
How can I organize a small pantry effectively?
Maximize space by using tiered shelves, door racks, and stackable bins. We suggest grouping small items like spice packets or tea bags into labeled baskets. Store taller items toward the back and shorter ones in front so nothing gets lost. In our experience, even the smallest pantries feel functional with smart vertical storage solutions.
Should I organize my pantry by category or frequency of use?
We recommend a mix of both. Group items by category—like baking supplies or snacks—for clarity, then place the most frequently used items at eye level for easy access. Less-used items can go on higher or lower shelves. This method balances organization with daily convenience, which we’ve found keeps pantries both neat and practical.
How often should I clean and reorganize my pantry?
We suggest doing a quick check every month and a full cleanout every three to six months. Use this time to check expiration dates, wipe shelves, and reassess your layout. In our experience, regular maintenance prevents clutter from building up and helps you keep track of what you have, reducing food waste and last-minute grocery runs.
Final Thoughts
Setting up an organized pantry doesn’t require expensive tools or a large space—just a thoughtful plan and consistent habits. We’ve found that clear containers, smart labeling, and logical grouping make meal prep easier and reduce food waste. A well-organized pantry reflects how you cook and eat, so tailor it to your routine for the best results.
Start small: pick one shelf or category to organize today. Once you see the difference it makes, you’ll likely want to keep going. We believe a functional pantry is one of the simplest upgrades that pays off every single day—in less stress, more time, and a kitchen that truly works for you.