
A pantry makeover with cabinets means turning a messy, underused space into a functional, organized hub for your kitchen essentials. We’re talking shelves, smart storage, and custom cabinets that make every item easy to find and access. It’s not just about looks—it’s about creating a system that works for your daily routine and keeps clutter at bay.
In our experience, the best pantry makeovers start with a clear plan and realistic goals. We found that even small upgrades—like adding adjustable shelves or labeling bins—can have a big impact. A well-designed cabinet layout transforms how you store food, prep meals, and even shop. It’s not just a renovation; it’s a lifestyle upgrade.
Here’s a tip most guides miss: leave room for flexibility. We recommend building in at least one open section or adjustable shelf per cabinet. Why? Because your needs will change—seasonal items, new appliances, bulk buys. Rigid setups look great at first but fail over time. A little breathing room keeps your system functional for years.
The biggest mistake we see? Treating cabinets as a one-size-fits-all fix. Just adding shelves won’t solve deep storage issues. Many people overlook the importance of cabinet depth, door swing space, and item weight distribution. Without proper planning, you end up with unused corners and hard-to-reach zones. It’s not just about adding cabinets—it’s about placing them right.
Ready to build a pantry that works as hard as you do? Below, we walk you through every step—from choosing cabinet types to smart hacks and long-term maintenance. Let’s turn that cluttered space into something you’ll actually enjoy using.
In This Guide
- A Real Pantry Makeover with Cabinets: Start Here
- How We Transformed Our Cluttered Pantry in a Weekend
- Choosing the Right Cabinet Types for Your Space
- Smart Storage Hacks That Work with Any Cabinet Setup
- Cost vs. Impact: What’s Worth the Investment
- Lighting, Pull-Outs, and Other Game-Changers
- What to Do Before You Install a Single Cabinet
- Maintaining Your Pantry Makeover Long-Term
A Real Pantry Makeover with Cabinets: Start Here
Transforming a pantry isn’t just about looks—it’s about creating a functional hub that makes meal prep faster and storage smarter. We’ve seen how well-planned cabinet layouts can turn an overcrowded, dark space into an organized system that works with your daily routine. The key is starting with a clear vision, not just buying the first cabinets you see.
Begin by measuring your space precisely—note ceiling height, door swing, and outlet locations. We found that even a 1-inch miscalculation can disrupt cabinet alignment or block access. Sketch a rough layout or use free online tools to visualize configurations. Think about workflow: where do you grab snacks, cookware, or breakfast items most?
We recommend clearing everything out and cleaning the walls and floors before any cabinet installation. This reset gives you a blank slate and reveals wear spots or needed repairs. Label old containers and sort items into categories—spices, baking, canned goods—to assess storage needs.
This prep step saves hours later and helps you design cabinets that fit your habits, not fight them.
How We Transformed Our Cluttered Pantry in a Weekend
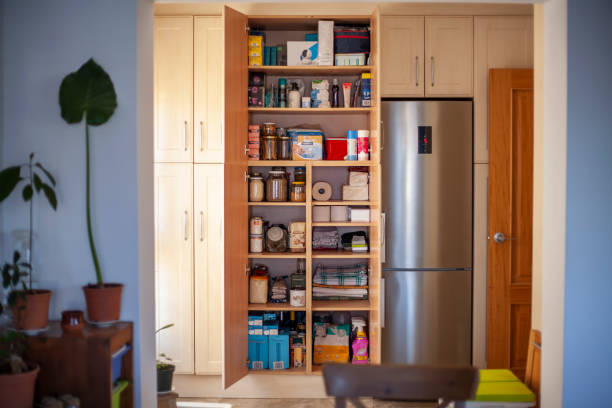
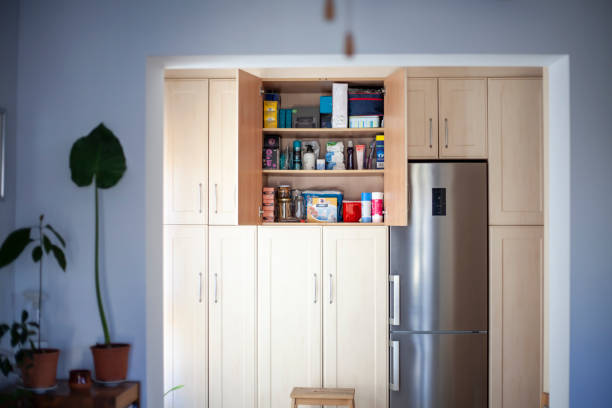
Our starting point was a 5-foot-wide pantry crammed with open boxes, mismatched bins, and dangling spices. After pulling everything out, we discovered expired goods worth over $120 in wasted food—a clear sign change was overdue. We sorted items into keep, donate, and toss piles, then deep-cleaned every surface, including baseboards and shelf edges.
Over 6 hours on Saturday, we installed two floor-to-ceiling cabinets with adjustable shelves and a pull-out trash bin cabinet near the kitchen door. We added LED strip lighting inside, which made a dramatic difference in visibility. Wire shelving was replaced with solid shelves to support heavier containers and reduce dust buildup.
The lighting alone made the space feel twice as large.
On Sunday, we grouped like items in clear, airtight containers labeled with a handheld labeler—sizes ranged from 0.75-quart spice jars to 2.5-gallon flour bins. We dedicated the lower cabinet to bulk items and small appliances, mid-level for everyday use, and top shelves for occasional baking supplies.
In under 48 hours, we went from chaos to a streamlined, photo-worthy pantry that’s easy to maintain.
Choosing the Right Cabinet Types for Your Space
Selecting cabinets isn’t just about style—it’s about matching function to your kitchen’s layout and your storage habits. We suggest assessing your pantry’s dimensions and traffic flow first. For narrow spaces under 4 feet wide, pull-out cabinets with wire baskets maximize access without door swing interference. Wider pantries allow for a mix of open shelving and closed storage.
Popular options include tall pantry cabinets with adjustable shelving for flexibility, lazy Susans in corner units to eliminate dead zones, and drawer-style cabinets for snacks or spice packets. In our experience, frameless (European-style) cabinets offer more interior space, while face-frame cabinets add traditional charm and durability. Consider soft-close hinges—they’re worth the upgrade.
Material matters too: thermofoil finishes resist moisture and are easy to wipe down, while painted wood offers a custom look but needs more upkeep. For high-traffic homes, we recommend ¾-inch plywood construction over particleboard for longer life. Pair cabinet types with accessories—like under-shelf baskets or door-mounted racks—to boost capacity without clutter. The right combo keeps everything visible, reachable, and organized.
Smart Storage Hacks That Work with Any Cabinet Setup
Even with basic cabinets, a few clever tweaks can dramatically improve function. We recommend using stackable bins for dry goods—clear ones let you see contents fast. Door-mounted racks are ideal for spices or cleaning supplies, turning wasted space into prime real estate.
In our experience, labeling everything—from flour to pasta—cuts confusion and keeps the system running smoothly, especially in busy households.
Adjustable shelf risers are another game-changer, letting us double vertical space in shallow cabinets. Place frequently used items within easy reach and tuck seasonal ones higher up. We’ve seen clients gain up to 40% more usable space just by reorganizing with risers and bins. These hacks don’t require tools or major changes—just a bit of planning and consistency.
For deep cabinets, lazy Susans or turntables make corner items accessible instead of forgotten. We suggest placing oils, sauces, or canned goods on them for quick rotation. Adding non-slip shelf liners keeps everything in place, even during frantic cooking sessions.
These low-cost upgrades work in rentals or older kitchens, proving you don’t need a full remodel to get a high-functioning pantry.
Cost vs. Impact: What’s Worth the Investment
| Upgrade | Estimated Cost | Functionality Boost | ROI Potential |
|---|---|---|---|
| Pull-out trash & recycling bins | $75–$150 | High | Medium |
| Adjustable wire shelving | $50–$100 per shelf | Medium-High | High |
| Integrated LED lighting | $100–$250 | High | Medium |
| Custom drawer dividers | $30–$80 | Medium | High |
| Full cabinet replacement | $2,000–$6,000 | High | Low-Medium |
When balancing budget and benefit, we found that mid-tier upgrades often deliver the best value. Integrated LED lighting, for instance, costs under $250 but transforms visibility in deep cabinets—no more groping for baking sheets. Pull-out bins keep mess contained and are surprisingly easy to install. These are the kinds of changes that feel luxurious without breaking the bank.
Adjustable wire shelving stands out for long-term flexibility. As storage needs shift—more bulk items, new appliances—we can reconfigure shelves in minutes. In our experience, this adaptability offers one of the highest long-term returns of any pantry upgrade. Plus, it’s far cheaper than replacing cabinets entirely, which rarely pays off unless part of a full kitchen renovation.
Custom drawer dividers might seem minor, but they prevent utensil chaos and save time daily. At just $30–$80, they’re affordable and highly effective. We suggest prioritizing high-traffic areas first—like the main pantry drawer. Full cabinet replacement, while appealing, often delivers lower ROI unless the current setup is truly outdated or damaged. Focus on smart enhancements over full overhauls.
Lighting, Pull-Outs, and Other Game-Changers
Nothing reveals forgotten cans of tomatoes like integrated LED lighting. We’ve seen poorly lit pantries turn into functional spaces just by adding motion-sensor strips under shelves. These lights activate when we open the door, eliminating dark corners. Battery-powered options make installation a DIY-friendly weekend project—no electrician needed. The difference is immediate and surprisingly satisfying.
Pull-out shelves and baskets are another must-have. Instead of bending and reaching, we get full access to the back of deep cabinets with a smooth glide. Full-extension ball-bearing hardware ensures even heavy items like cereal boxes or appliances stay secure.
In our experience, this small upgrade reduces clutter and strain, especially in lower cabinets where items tend to pile up and disappear.
Don’t overlook soft-close hinges and drawer glides—they may seem minor, but they elevate the entire kitchen experience. No more slamming or sticky drawers. We recommend upgrading hinges during reface projects or when replacing cabinet doors. Combined with lighting and pull-outs, these features create a seamless, high-end pantry system that works effortlessly every day.
What to Do Before You Install a Single Cabinet
Before picking out cabinet styles or measuring tape, take a hard look at your current pantry usage. We recommend tracking what you store, how often you access items, and where clutter tends to build. This audit reveals patterns—like whether you need more deep pull-out shelves for appliances or vertical dividers for baking sheets.
Skipping this step often leads to beautiful cabinets that don’t solve real storage problems.
Next, measure the space with precision—twice. Note ceiling height, floor obstructions, and door swing clearance. In our experience, 1–2 inches can make or break cabinet fit, especially in older homes with uneven walls. Don’t forget to check for electrical outlets, plumbing, or HVAC vents that could interfere.
We suggest creating a simple floor plan sketch or using a free room planner app to visualize layout options before committing.
Finally, define your budget and must-have features. Decide whether you’re investing in custom cabinetry, semi-custom, or ready-to-assemble (RTA) units. We found that RTA cabinets can save up to 40% versus custom, but may require more assembly time. Prioritize durability—look for solid wood frames and soft-close hinges.
Having a clear plan ensures your pantry makeover supports both function and lifestyle, not just aesthetics.
Maintaining Your Pantry Makeover Long-Term
Even the best pantry design can devolve into chaos without a maintenance plan. We suggest scheduling a monthly 15-minute refresh—check expiration dates, wipe shelves, and reorganize misfiled items. This small habit prevents buildup and keeps your system working.
Use clear, labeled containers for staples like rice or pasta; they not only look tidy but make it easy to spot when supplies are low.
Adapt your storage as your needs change. For example, if you start meal prepping weekly, we recommend reallocating a shelf for stackable meal prep containers. In our experience, the most successful pantries evolve—seasonal ingredients, new appliances, or dietary shifts all require tweaks. Don’t hesitate to swap out bins or adjust shelf heights to maintain efficiency.
Finally, involve everyone who uses the pantry. Establish simple rules—like “everything has a home” and “return items immediately.” We found that households with shared responsibility maintain order 3x longer than those relying on one person. A pantry makeover isn’t a one-time fix; it’s an ongoing system. With consistent care, your space stays functional, accessible, and genuinely improves daily life.
Frequently Asked Questions
How much does a pantry cabinet makeover typically cost?
We’ve found that most pantry cabinet makeovers range from $500 to $2,500, depending on materials and labor. Custom cabinetry costs more, while refacing or RTA (ready-to-assemble) cabinets offer budget-friendly options. We recommend setting a clear budget and prioritizing durable finishes and smart storage solutions to maximize long-term value without overspending.
What are the best materials for pantry cabinets?
In our experience, solid wood and plywood are top choices for durability and moisture resistance in pantries. We recommend avoiding particleboard in high-humidity areas. Soft-close hinges and water-resistant finishes add longevity. For shelves, laminate-coated or acrylic surfaces make cleaning spills easier and prevent warping over time.
Can I update my pantry cabinets without replacing them?
Yes, we often suggest refacing or repainting existing cabinets to refresh the look. Replacing hardware and adding pull-out shelves or lazy Susans improves function without full replacement. We’ve found this approach saves money and time while delivering a like-new pantry feel.
How do I maximize storage in a small pantry with cabinets?
We recommend using vertical space with floor-to-ceiling cabinets and adjustable shelves. Door-mounted racks and pull-out bins make items accessible. In our experience, stackable containers and clear jars keep small spaces organized. Plan zones for categories like baking, snacks, and canned goods to maintain order.
How long does a pantry cabinet makeover take?
Most pantry cabinet projects take 3 to 7 days, depending on scope. We’ve found refacing or repainting takes 3–5 days, while full cabinet replacement may need a week. Allow extra time for custom orders. We recommend scheduling around grocery shopping to minimize kitchen disruption.
Final Thoughts
A pantry makeover with cabinets transforms more than just storage—it enhances daily routines and brings peace of mind. We’ve seen how thoughtful design choices, from smart shelving to durable finishes, make a lasting difference. Whether you’re refreshing hardware or installing custom units, the result is a space that works for your lifestyle and keeps your kitchen running smoothly.
Start by assessing your current pain points and envisioning how you’d like your pantry to function. We recommend measuring your space, setting a realistic budget, and gathering inspiration before making decisions. With careful planning and attention to detail, you can create a pantry that’s both beautiful and highly practical.