
Looking for open shelf pantry ideas? We’ve got you covered. Open shelves in your pantry offer easy access, a stylish display, and a sense of openness in your kitchen. From matching containers to clever lighting, the right setup can turn everyday storage into a design highlight—without sacrificing function for form.
In our experience, the best open shelf pantry ideas balance beauty and practicality. We recommend starting simple: group similar items, use consistent containers, and leave breathing room. Overcrowding is the enemy. We found that even small tweaks—like adding labels or switching jar styles—make a big difference in how polished your pantry feels every day.
Here’s a tip most guides miss: rotate your items by depth, not just height. We suggest placing shorter items in front and taller ones behind. This creates layers, adds dimension, and actually makes everything easier to reach. It’s a small shift that keeps your shelves from looking flat or accidental.
The biggest mistake? Thinking everything must be visible. Just because shelves are open doesn’t mean every can and box should stay out. We’ve seen too many pantries that look cluttered because they display expired spices or mismatched packaging. Visibility shouldn’t come at the cost of order.
Ready to build a pantry that looks good and works better? We’ve broken down the smartest strategies—from layout to lighting—so you can create a space that’s easy to use and a joy to show off. Let’s dive in.
In This Guide
- How to Style an Open Shelf Pantry So It’s Pretty and Practical
- Containers That Keep Your Open Shelf Pantry Looking Clean
- Arranging Groceries Like a Pro: A Visual Guide
- Open Shelf Pantry Mistakes That Make It Look Cluttered
- Quick Comparison: Best Materials for Shelves and Supports
- How to Light Your Open Shelf Pantry for Maximum Appeal
- Mixing Decor and Dry Goods Without Looking Messy
- Small Space? No Problem — Open Shelving Hacks That Work
How to Style an Open Shelf Pantry So It’s Pretty and Practical
Styling an open shelf pantry well means balancing beauty with daily usability. We recommend starting with a cohesive color palette—think neutral jars, white ceramics, or earth-toned baskets—to create visual calm. Group similar items together, like baking supplies or breakfast staples, so everything has a purposeful home.
Function should never take a backseat to form in a space you use every day.
Spacing matters just as much as what you display. We suggest leaving at least 2–3 inches between grouped items to avoid cluttered sightlines. Use risers or tiered shelves to create depth and make lower items accessible. In our experience, pantries that feel inviting also tend to be kept cleaner—because you actually *want* to maintain them.
Don’t forget lighting. Under-cabinet LED strips or small puck lights can spotlight your favorite containers and make the space feel curated. Add a small trailing plant or a framed label holder for personality. Remember: the goal is to design a pantry that looks magazine-worthy but still holds your weekly grocery haul without stress.
Containers That Keep Your Open Shelf Pantry Looking Clean
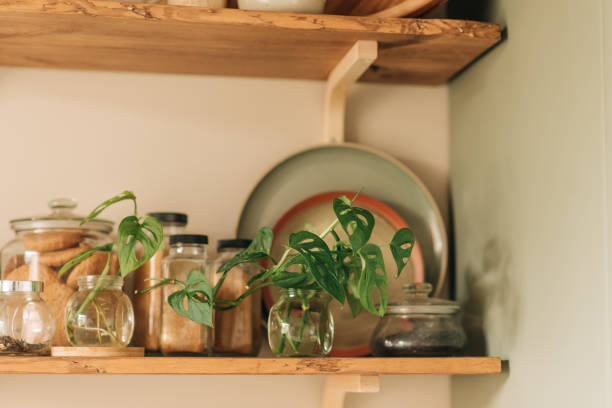
Choosing the right containers transforms a chaotic pantry into a streamlined hub. We recommend airtight glass jars with metal lids for dry goods like pasta, rice, and beans—they’re durable, easy to clean, and show off contents beautifully. Look for wide-mouth versions for simpler scooping. Uniform shapes, like cylindrical or square, maximize shelf space and look more cohesive.
For items you use less frequently, stackable acrylic bins or fabric-covered baskets work well. They hide less photogenic packages while maintaining access. We found that labeling every container—either with a chalkboard sticker or a sleek printed tag—reduces confusion and keeps everyone in the household on the same page. Clarity is just as important as containment.
Consider portion and frequency when selecting sizes. A 1-quart jar fits about 1.5 cups of flour, perfect for weekly bakers, while a 2-gallon bin suits bulk pet food. In our experience, matching container style across shelves—like all clear glass or all matte white—creates instant harmony, even when contents vary.
Arranging Groceries Like a Pro: A Visual Guide
Pro-level pantry arranging starts with zoning. We suggest dividing your shelf space into clear categories: breakfast, baking, snacks, canned goods, and cooking staples. Place everyday items at eye level—like coffee pods or cereal—so they’re easy to grab. Reserve top shelves for lighter, less-used items like holiday spices or extra paper goods.
Within each zone, arrange items by height—tall containers in the back, short ones in front—so nothing gets lost. We recommend using the “rule of threes”: group items in odd numbers (three jars, three boxes) for a more dynamic, pleasing look. Rotate stock using the first-in, first-out method to avoid expired surprises.
Color coding boosts both function and aesthetics. Line up canned goods with labels facing forward, or group spice jars by hue—reds (paprika, chili), yellows (turmeric, mustard), and greens (oregano, parsley). In our experience, a well-ordered shelf doesn’t just look better—it helps you see what you have, cut food waste, and cook faster.
Open Shelf Pantry Mistakes That Make It Look Cluttered
One of the most common mistakes we see is overcrowding shelves without leaving breathing room between items. When every inch is filled, the space feels chaotic instead of curated. We recommend keeping at least 2–3 inches of negative space between groupings to create visual balance. It’s tempting to display everything, but less is more when styling open storage.
Another issue is mixing too many container styles or materials—glass, metal, plastic, wood—all in one area. This lack of cohesion distracts the eye and undermines the clean look we’re aiming for. Stick to one or two dominant materials and colors. For example, using all clear glass jars with black labels creates consistency while still allowing contents to be visible.
We also frequently spot mismatched canisters or varying jar heights with no intentional arrangement. Without a sense of order, even organized items appear messy. Group like with like, and align similar-sized containers together. Use risers or tiered stands to create levels, but keep heights within a 2-inch variance for a polished, intentional display that feels both functional and inviting.
Quick Comparison: Best Materials for Shelves and Supports
| Material | Weight Capacity (per ft) | Style Fit | Cost Range (per linear ft) |
|---|---|---|---|
| Hardwood (e.g., Oak, Walnut) | 50–75 lbs | Warm, traditional, rustic | $25–$40 |
| Tempered Glass | 30–40 lbs | Modern, sleek, minimalist | $30–$50 |
| Steel or Powder-Coated Metal | 75–100+ lbs | Industrial, contemporary | $20–$35 |
| Plywood with Laminate Finish | 40–50 lbs | Mid-century, budget-friendly | $10–$20 |
Selecting the right material impacts both durability and design. We’ve found hardwood shelves add warmth and hold up well over time, but they require solid supports and can warp under heavy loads if not properly sealed. They’re ideal for farmhouse or traditional pantries where rich texture enhances the aesthetic.
Tempered glass offers a floating effect that makes small spaces feel larger, but it demands frequent cleaning to avoid smudges and water spots. While it supports moderate weight, we suggest using it for lighter items like spices or decorative jars. Its reflective surface can also amplify lighting, adding to the pantry’s visual depth.
For high-load environments, steel or powder-coated metal is our top pick. These supports handle heavy canisters, appliances, or bulk goods without sagging. Paired with wood or glass shelves, they deliver industrial charm and serious strength. Just ensure wall anchors match the material’s load specs—underestimating weight leads to costly repairs.
How to Light Your Open Shelf Pantry for Maximum Appeal
Proper lighting transforms a functional pantry into a standout design feature. We’ve seen too many open shelves lost in shadow, making contents hard to identify and the space feel like an afterthought. Install lighting at the front edge of each shelf to cast a soft glow downward, highlighting both the items and the shelf texture.
This creates depth and drama without harsh glare.
LED strip lights are our go-to recommendation—flexible, low-profile, and energy efficient. Choose a color temperature between 2700K and 3000K for warm, inviting light that makes food look appetizing. We suggest models with adhesive backing and a remote dimmer so you can adjust brightness based on time of day or task.
Make sure the strips are rated for enclosed spaces if tucked under lip edges.
For a more custom look, consider puck lights or mini spotlights mounted to the ceiling or top shelf. These offer focused illumination and work well in deeper pantries. We recommend placing lights every 12–16 inches for even coverage.
Pair with a motion sensor or door switch so the pantry lights up automatically—functionality meets flair** every time you reach for dinner ingredients.
Mixing Decor and Dry Goods Without Looking Messy
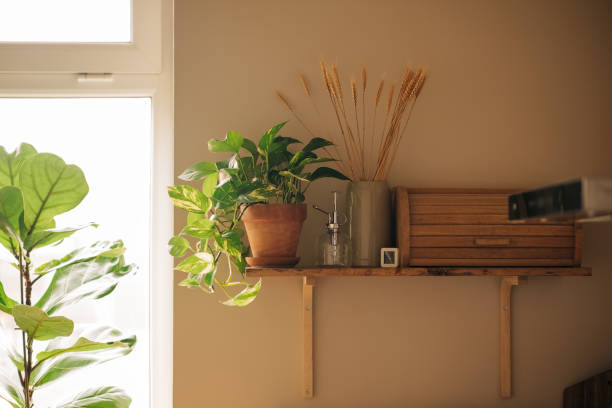
Combining everyday pantry items with decorative pieces on open shelves can elevate your kitchen’s style—if done with intention. We recommend grouping items by color, material, or function to create visual rhythm. For example, place white ceramic canisters next to matching stoneware bowls, then add a small potted herb or minimalist vase to break the monotony.
This curated approach keeps the space feeling cohesive, not cluttered.
Uniformity is key when blending food storage with decor. We found that using matching glass jars for dry goods like pasta, rice, and beans instantly makes shelves look more organized. Pair these with a few well-placed decorative objects—such as a matte black soap dispenser or woven trivet—that echo the jar lids’ finish.
The repetition of tones and textures helps the eye move smoothly across the shelf.
To avoid a chaotic look, follow the rule of three: for every three storage containers, include one decorative item. This could be a small art print in a slim frame, a stack of vintage cookbooks, or a sculptural spoon rest. We suggest rotating decor seasonally to keep the space feeling fresh without overcrowding.
Less truly is more—leave 30% of shelf space empty for breathing room.
Small Space? No Problem — Open Shelving Hacks That Work
When square footage is tight, open shelves can actually make your kitchen feel larger—as long as they’re smartly organized. We recommend installing shelves no wider than 24 inches and spacing them 12–15 inches apart vertically to fit essentials without overwhelming the wall. Positioning them above countertops or sinks maximizes unused zones, turning dead space into functional storage.
Use tiered shelf risers or small wire baskets to double your storage on a single shelf. For example, place a riser under which you can stash spice jars, then stack mugs on top. We found that clear 3-inch-deep acrylic bins are perfect for holding tea bags or snack packs—visible but contained. These small upgrades dramatically increase capacity without sacrificing style.
Go vertical: stackable containers and hanging hooks make every inch count. We suggest using magnetic spice tins on the side of a metal shelf bracket or under a cabinet lip. For even more efficiency, install a narrow floating shelf just 6 inches deep for frequently used oils or salts.
In our experience, these micro-solutions keep essentials within reach while maintaining a clean, uncluttered aesthetic.
Frequently Asked Questions
How do you organize an open shelf pantry?
We recommend sorting items by category, frequency of use, and visual appeal. Group like with like—cereals, snacks, baking supplies—and use matching containers for a clean look. Place everyday items at eye level and heavier goods on lower shelves. In our experience, labeling jars and baskets improves accessibility and keeps clutter under control while maintaining an attractive, functional space.
What should I store on open pantry shelves?
Display frequently used, aesthetically pleasing items like glass jars of dry goods, ceramic canisters, and matching baskets. We’ve found it best to store coffee, tea, snacks, and healthy staples in view, while reserving closed cabinets for less attractive items like oil bottles or cleaning supplies. This balances style and practicality while keeping your kitchen organized and efficient.
How do you style an open pantry shelf?
We suggest mixing function with visual harmony. Use uniform storage containers, varying heights for interest, and decorative baskets for small items. Incorporate greenery like a small potted herb and add a small art piece or framed label for personality. In our experience, limiting color palettes to 2–3 tones creates a cohesive, inviting look that feels curated, not cluttered.
How do you keep open pantry shelves from looking messy?
Regular editing is key. We recommend purging expired items monthly and grouping contents in labeled bins or baskets. Use consistent containers and keep only what fits neatly. In our experience, a “one in, one out” rule prevents overcrowding. Wipe shelves weekly to manage dust and spills, maintaining both cleanliness and visual order in your open pantry.
Are open shelf pantries practical for small kitchens?
Yes, they can be highly practical. We’ve found open shelves maximize limited space by improving visibility and access. Use vertical stacking and wall-mounted rails for extra storage. Just be selective about what’s displayed. In our experience, small kitchens benefit from a mix: open shelves for everyday items and closed storage for bulk goods, creating both function and openness.
Final Thoughts
Open shelf pantries offer a blend of accessibility, style, and practicality that can transform how we interact with our kitchens. We’ve found they encourage better organization and make meal prep more enjoyable when designed with intention. By combining smart storage solutions with personal touches, they become both functional hubs and expressive spaces that reflect our daily rhythms.
Start by assessing your most-used items and choosing simple, cohesive containers. Even a single open shelf can make a difference. We encourage you to experiment and adjust as you go—small changes often lead to big improvements in how we store, find, and enjoy our pantry essentials every day.