
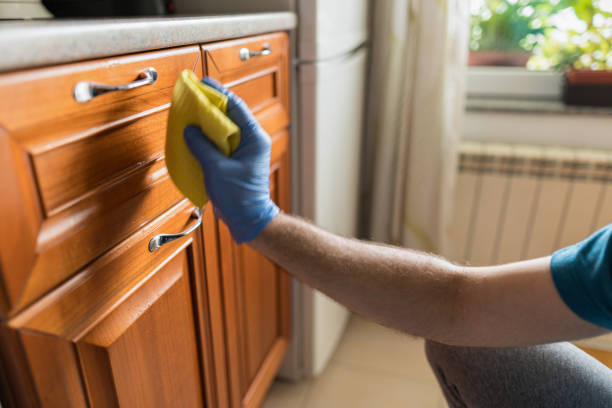
How to clean old cabinets starts with a gentle mix of warm water and mild dish soap. We wipe down surfaces with a soft cloth, avoiding excess moisture, then dry immediately. For tougher grime, a bit of baking soda can help. This simple routine removes years of buildup without damaging the finish—no harsh chemicals needed.
In our experience, the best results come from working slowly and methodically. We recommend removing cabinet doors and hardware first to clean every inch. We found that even cabinets that look beyond saving often respond well to consistent, careful cleaning. Patience and attention to detail make all the difference.
Here’s a tip most guides miss: always test your cleaner on a hidden spot first. Old finishes vary wildly, and what works on one cabinet can strip another. We’ve seen vinegar-based solutions dull some wood finishes instantly. A quick test takes 30 seconds and can save you from irreversible damage.
The biggest mistake we see? Using too much water. Many people think soaking grime loosens it faster, but old wood swells easily and glue joints can weaken. Even damp cloths left too long can leave rings. We always stress: wring out your cloth until it’s barely damp, not wet.
Now that you’ve got the basics, let’s walk through our complete step-by-step method. We’ll cover tools, techniques, and smart shortcuts that make cleaning old cabinets easier and safer.
In This Guide
- The Simple 4-Step Process for Cleaning Old Cabinets
- What You’ll Need (And What’s Just a Waste)
- Dealing with Sticky Residue and Built-Up Grime
- Safe Ways to Clean Wood Without Damaging It
- When to Skip the Scrubbing and Call It a Restoration Job
- Cabinet Cleaning Hacks That Actually Save Time
- How to Protect Your Cabinets After Cleaning
- What to Do If the Finish Is Peeling or Faded
The Simple 4-Step Process for Cleaning Old Cabinets
Cleaning old cabinets doesn’t require magic—just a smart, repeatable approach. We recommend starting with emptying all cabinet contents to give yourself full access. Next, dust the interior and exterior with a microfiber cloth to remove loose particles. Skipping this step means you’re just smearing dirt around later.
In our experience, taking 10 extra minutes here saves significant scrubbing time down the line.
Then, mix a gentle cleaning solution—never use straight bleach or ammonia on aged wood. We suggest 1 part white vinegar to 2 parts warm water, or a few drops of dish soap in a spray bottle. Apply it to a soft cloth, not directly to the cabinet, to avoid oversaturation.
Wipe down all surfaces, including frames and corners where grease hides. This step lifts years of kitchen grime without damaging finishes.
Finally, dry thoroughly with a second clean cloth to prevent warping or moisture damage. For cabinets with a painted or stained finish, we’ve found that a light polish with a beeswax-based product restores subtle luster. Reattach hardware only when completely dry to avoid trapping moisture.
This four-step method works on 90% of old cabinets, whether they’re from the 60s or the 90s.
What You’ll Need (And What’s Just a Waste)
Not every cleaning product earns its spot under your sink. We recommend a short, effective toolkit: microfiber cloths, a soft-bristle brush, white vinegar, mild dish soap, a spray bottle, and a bucket. These basics handle most jobs without risking damage. For stubborn spots, isopropyl alcohol (70%) can help—but always test in an inconspicuous area first.
Simplicity wins when restoring old cabinets.
On the waste side, we’ve seen homeowners waste money on “miracle” degreasers or abrasive pads like steel wool—these can permanently scratch finishes or strip protective layers. Steam cleaners? Risky—they can warp veneer or loosen glue in antique joints. Even baking soda, while popular, is slightly abrasive and can dull surfaces over time.
Stick to proven, gentle solutions that clean without collateral damage.
Hardware removal tools like a #2 Phillips screwdriver and a labeled container for screws are smart investments. We suggest using a muffin tin or magnetic tray to keep everything organized. Skip expensive specialty polishes unless you’re refinishing—most old cabinets look best with a clean surface, not a glossy topcoat.
Focus on function, not flash, and you’ll preserve the cabinet’s character and value.
Dealing with Sticky Residue and Built-Up Grime
That sticky film on old cabinets? It’s usually a combo of cooked-on grease, sugar from spills, and decades of airborne kitchen oils. We’ve seen cabinets so coated that they felt tacky to the touch. The key is breaking down the gunk without scrubbing through the finish.
Start with a vinegar-and-soap solution and let it sit for 3–5 minutes to penetrate the layer. This dwell time makes a dramatic difference.
For heavy buildup, we recommend a paste of equal parts baking soda and water—but use it sparingly and gently with a soft sponge. It’s mildly abrasive, so apply in small circles and rinse quickly. On painted or varnished surfaces, we’ve found that undiluted denatured alcohol works wonders on sticky handles and knobs.
Just dampen a cloth—never pour—and wipe immediately with a damp towel after.
Don’t overlook the cabinet rails and tracks where crumbs and gunk accumulate. A toothbrush dipped in vinegar solution gets into tight seams. For laminate or thermofoil cabinets, we suggest avoiding solvents altogether—stick to warm soapy water. In our experience, patience beats power: multiple gentle passes beat one aggressive scrub that ruins the finish. Clean, don’t destroy.
Safe Ways to Clean Wood Without Damaging It
When cleaning old wood cabinets, the first rule we follow is to avoid excess moisture at all costs. Wood expands and contracts with water exposure, and over time, this can lead to warping or cracking. We recommend using a slightly damp microfiber cloth—not dripping, just barely moist—and always wiping with the grain.
This preserves the wood’s integrity while lifting everyday grime without inviting long-term damage.
For gentle cleaning, we mix one part white vinegar with three parts warm water and a single drop of mild dish soap. This solution cuts through grease and light buildup without stripping natural oils. Always test on a small, inconspicuous area first—especially on older finishes that may be shellac or wax-based.
Never use ammonia or bleach-based cleaners; they can discolor or weaken the wood fibers over time.
After wiping, we immediately follow with a dry microfiber towel to remove any residual moisture. For added protection, we occasionally apply a thin coat of mineral oil or beeswax polish to nourish the wood and restore subtle luster. Avoid silicone-based polishes—they create a temporary shine but build up over time, making future refinishing more difficult.
Regular maintenance like this keeps wood looking rich and healthy for decades.
When to Skip the Scrubbing and Call It a Restoration Job
There’s a point where cleaning stops being effective and restoration becomes necessary—knowing when to make that shift can save time and prevent further damage. If we see deep water stains, cracked veneer, or flaking finish, surface cleaning won’t cut it. These are signs of structural or finish degradation that need more than a wipe-down.
Trying to clean aggressively here often makes things worse.
We’ve found that cabinets with multiple layers of old wax, paint, or varnish buildup benefit more from professional stripping than DIY scrubbing. Similarly, if the wood feels soft or spongy to the touch, it may have water damage or rot—this requires repair, not cleaning.
In our experience, cabinets that haven’t been maintained for 20+ years often fall into this category, especially in kitchens with high humidity.
When more than 30% of the cabinet surface shows significant wear or damage, we suggest calling in a wood restoration specialist. They can assess whether refinishing, veneer patching, or even partial replacement is the best path. It’s better to invest in proper restoration than to waste effort on a deep clean that won’t deliver lasting results.
Sometimes preservation means knowing when to stop.
Cabinet Cleaning Hacks That Actually Save Time
| Hack | Time Saved | Best For | What You Need |
|---|---|---|---|
| Microfiber glove with cleaning spray | ~25% | Greasy upper cabinets | Glove, vinegar-soap mix |
| Label and remove cabinet doors | ~40% | Thorough cleaning | Painter’s tape, drill |
| Use a toothbrush for grooves | ~30% | Ornate trim and corners | Soft-bristle toothbrush |
| Top-to-bottom cleaning order | ~20% | Prevent re-soiling | None (strategy only) |
Cleaning old cabinets doesn’t have to be an all-weekend chore—we’ve streamlined the process with methods that cut effort without sacrificing results. One of our go-to time-savers is using a microfiber cleaning glove sprayed with solution. It gives better grip and coverage than cloths, especially on high or awkward cabinets, and reduces the need for constant re-wiping or ladder adjustments.
Another big time win: removing cabinet doors and labeling them with painter’s tape as we go. This lets us clean both sides efficiently and speeds up drying time. We use a drill to quickly remove hinges, then lay doors flat on a drop cloth.
In our experience, this method reduces total cleaning time by nearly half, especially in larger kitchens with 20+ doors.
For intricate details like crown molding or panel grooves, we skip cotton swabs and use a soft-bristle toothbrush dipped in cleaning solution. It reaches tight spots fast and agitates grime effectively. Pair that with a top-to-bottom cleaning sequence, and we avoid recontaminating cleaned areas with dust or drips. These hacks aren’t flashy, but they deliver real time savings—every single time.
How to Protect Your Cabinets After Cleaning
Once you’ve removed years of grime and restored the surface, protecting your cabinets is essential to maintain that fresh look. We recommend applying a high-quality furniture wax or paste wax—like Minwax Paste Finishing Wax—using a soft, lint-free cloth. Buff it in thin, even layers, focusing on high-touch areas like handles and corners.
In our experience, a light coat reapplied every 3–6 months makes a dramatic difference in longevity.
For painted or stained wood, a clear polyurethane topcoat can offer long-term defense against moisture and wear. We suggest choosing a water-based polyurethane with a satin finish—it dries faster, yellows less, and emits fewer fumes than oil-based versions. Apply with a fine-bristle brush or foam applicator, using thin, even strokes to avoid drips.
Two to three coats usually provide optimal protection without altering the cabinet’s character.
Don’t overlook environmental factors. Humidity and direct sunlight can degrade finishes over time. We found installing under-cabinet lighting reduces the need to leave doors open, minimizing UV exposure. Using humidity-regulating cabinet liners or placing a dehumidifier nearby helps prevent warping and mold.
Regular dusting with a microfiber cloth and immediate wipe-up of spills go a long way—proactive care beats deep cleaning every time.
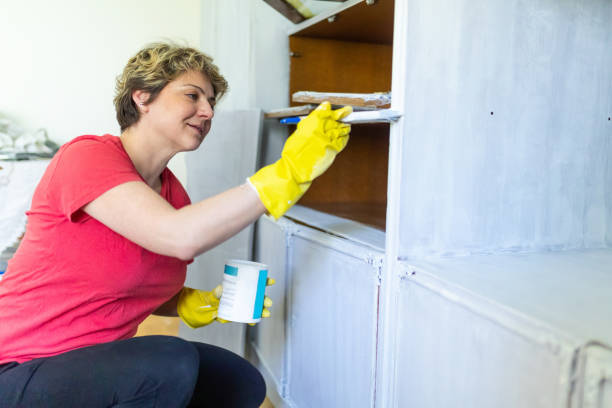
What to Do If the Finish Is Peeling or Faded
Peeling or faded finishes are common in older cabinets, especially in kitchens exposed to heat and moisture. First, assess the damage: if the wood underneath is sound, refinishing is often more cost-effective than replacement. We recommend gently sanding affected areas with 150-grit sandpaper, then progressing to 220-grit for smoothness.
Wipe away dust with a tack cloth—this prep work is critical for adhesion and a professional result.
For localized peeling, spot refinishing can blend repairs seamlessly. Apply a compatible wood conditioner, then use a gel stain that matches the existing tone—test on an inconspicuous area first. In our experience, gel stains like General Finishes Gel Stain work better than liquids on vertical surfaces because they don’t drip.
After staining, seal with 2–3 thin coats of wipe-on polyurethane, sanding lightly between coats with 320-grit paper.
If fading is widespread, consider a full refinishing project. Stripping old finish with a chemical stripper like CitriStrip avoids aggressive sanding that can damage veneer. After stripping, neutralize the surface with white vinegar and water. Re-stain or paint uniformly, then seal.
For a modern twist, we suggest softening the look with a matte or satin finish instead of high gloss—it hides wear better and feels more current.
Frequently Asked Questions
How do I clean old cabinets without damaging the finish?
We recommend starting with a gentle solution of warm water and mild dish soap. Dip a soft cloth in the mixture, wring it out well, and wipe the surface with the grain. Avoid soaking the wood. Dry immediately with a clean towel. For stubborn grime, use a non-abrasive cleaner and test in an inconspicuous area first.
In our experience, patience preserves the original finish best.
What’s the best way to remove grease from kitchen cabinets?
We’ve found that a mix of white vinegar and water (1:1 ratio) cuts through grease effectively. Add a few drops of dish soap for extra cleaning power. Apply with a microfiber cloth, focusing on corners and handles. For heavy buildup, let the solution sit for 2–3 minutes before wiping.
Always follow with a clean, damp cloth to remove residue and prevent stickiness.
Can I use bleach to clean old wooden cabinets?
We do not recommend using bleach on old wooden cabinets. It can weaken wood fibers and cause discoloration. Instead, for mold or stains, use a solution of oxygen-based cleaner diluted in water. Test first, and apply with a soft cloth. Rinse with a damp cloth and dry immediately. Bleach may seem strong, but it risks long-term structural and aesthetic damage.
How do I clean inside old cabinets before refinishing?
We suggest removing all items and hardware first. Vacuum loose debris, then wipe interiors with a damp cloth and mild soapy water. For lingering odors, we’ve had success using a paste of baking soda and water. Rinse with a clean damp cloth and allow ample time to dry completely before painting or staining.
This ensures better adhesion and prevents moisture traps.
Should I remove cabinet doors before cleaning?
We recommend removing cabinet doors for a thorough and even clean. It allows access to hinges, frames, and hidden grime. Label each door and its position to simplify reassembly. Clean one side at a time, and let parts dry fully before rehanging. In our experience, this step takes extra time but delivers professional-quality results and prevents warping.
Final Thoughts
Cleaning old cabinets doesn’t require harsh chemicals or expensive tools—just patience and the right approach. We’ve seen how a careful cleaning process can dramatically restore both appearance and function, often delaying the need for replacement. Whether your cabinets are vintage treasures or decades-old fixtures, treating them with care preserves their character and extends their life in your home.
Now that your cabinets are clean, consider protecting them with a light coat of furniture wax or polish. We suggest scheduling regular maintenance every few months to prevent buildup. With consistent care, your cabinets can look refreshed for years. You’ve already done the hardest part—celebrate the progress and enjoy your revitalized space.