
If you’re looking for pull out pantry organization ideas, you’re not just after neat shelves—you want a system that makes every item easy to find and access. The best solutions combine smart storage, clear labeling, and sliding components that bring the back of the pantry forward.
We’ve tested layouts that turn even the narrowest pull out pantries into highly functional spaces.
In our experience, the most effective pull out pantry organization ideas start with understanding how you actually use your kitchen. We recommend grouping items by category and frequency of use, then assigning zones. Whether it’s snacks, breakfast staples, or cooking oils, placing them where you use them most reduces clutter and makes meal prep faster.
Here’s a tip most guides miss: leave an inch of breathing room around bins and baskets. As you refill them, contents expand. Without that gap, sliding shelves jam. We found that slightly undersizing containers—even by just 1–2 inches—makes a huge difference in long-term usability, especially in deeper cabinets.
A common mistake is overfilling shelves to the point where items get lost in the back. Just because a pull out pantry slides doesn’t mean you can stack haphazardly. We’ve seen homeowners turn these spaces into black holes for pasta boxes and spice jars—all because they ignored visibility and access in favor of capacity.
Ready to build a smarter system? Below, we break down the best storage hacks, container picks, and layout tips that turn your pull out pantry into a well-oiled kitchen powerhouse.
In This Guide
- How to Organize a Pull Out Pantry So Everything Stays in Place
- Sliding Shelf Solutions That Maximize Every Inch
- The Lazy Susan Hack for Deep Corner Pantries
- Adjustable Bins and Baskets That Grow With Your Needs
- Best Containers for a Pull Out Pantry (And Which Ones to Skip)
- Stacking Strategies for Canned Goods and Small Items
- Lighting and Labeling Tips You’ll Wish You Knew Sooner
- Pull Out Pantry Upgrades That Feel Like a Kitchen Remodel
How to Organize a Pull Out Pantry So Everything Stays in Place
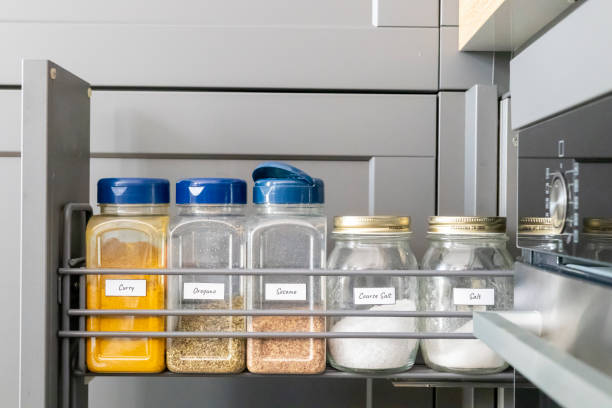
Keeping items secure in a pull out pantry starts with strategic compartmentalization. We recommend using adjustable bins and clear stackable containers to group similar items—like snacks, baking supplies, or canned goods—so they don’t shift when the shelf glides open.
Visibility is key: opaque bins make it harder to spot what you need, so we found clear, lidded containers with front labels work best for quick identification and stability.
Securing containers to the shelf base with double-sided tape or Velcro strips prevents sliding, especially on deeper units. We suggest choosing bins with non-slip bases or rubberized edges—these stay put even with frequent access.
For loose items like spice packets or tea bags, small acrylic dividers or drawer inserts maintain order and reduce clutter buildup in corners where things tend to get lost.
Weight distribution also plays a big role in pantry stability. Heavier items—canned vegetables, oils, and jars—should go on lower shelves to keep the center of gravity low and prevent tipping. Lighter goods like chips or pasta boxes belong higher up.
In our experience, labeling shelf zones—“Breakfast,” “Baking,” “Canned Goods”—encourages household members to return items correctly, keeping everything in its place long-term.
Sliding Shelf Solutions That Maximize Every Inch
Sliding shelves transform awkward, hard-to-reach spaces into highly functional storage zones. We’ve seen deep cabinets go from underused to ultra-efficient with the addition of full-extension ball-bearing glides, which allow shelves to extend up to 90% for complete access. Pair these with tiered shelving to create vertical layers—ideal for displaying spices, condiments, or oils so nothing gets buried in the back.
For narrow pantries, pull-out wire baskets or chrome-tier organizers make excellent use of slim footprints. We recommend models that are at least 12 inches deep to hold standard-sized jars and boxes without overhang. Installing multiple tiers—say, one for breakfast items on top and snacks below—creates intuitive zones while preventing overcrowding on any single level.
Custom solutions like motorized lift systems or telescoping shelves take convenience further, especially in tall units. But even budget-friendly DIY sliding platforms built with drawer slides and plywood can double usable space. In our experience, adding LED strip lighting under each shelf not only improves visibility but also highlights organization, making it easier to grab what you need without rummaging.
The Lazy Susan Hack for Deep Corner Pantries
Deep corner pantries often become black holes where items vanish behind others. The lazy Susan is the ultimate fix—its rotating design brings every item into view with a simple spin. We suggest choosing freestanding models with multiple tiers or wall-mounted versions with ball-bearing bases for smooth 360-degree access, even when fully loaded.
For maximum efficiency, zone your lazy Susan by category: top tier for oils and sauces, middle for spices, bottom for larger jars or canned goods. We found that dividers or tiered turntables prevent items from toppling and help maintain order.
Opt for models with raised edges or lip guards—these keep bottles upright and containers from sliding off during rotation, especially in high-traffic kitchens.
Installing a custom-built lazy Susan into a corner cabinet can be a game-changer. We recommend models that extend slightly beyond the cabinet frame when opened for better reach. Pair it with clear bins or labeled containers to maintain visual flow.
In our experience, this simple hack can increase usable space in a corner pantry by up to 70%, turning a frustrating死角 into one of the most functional spots in the kitchen.
Adjustable Bins and Baskets That Grow With Your Needs
When we’re designing a pull-out pantry, flexibility is everything—especially since our storage needs shift with seasons, diets, and household changes. That’s why we recommend adjustable bins and baskets made from sturdy wire or reinforced plastic. These let us customize shelf heights and compartment sizes on the fly, accommodating everything from tall cereal boxes to short spice jars.
Being able to reconfigure as needed prevents wasted vertical space, a common issue in deep pull-out units.
We’ve found that systems like Rev-A-Shelf’s wire basket with modular dividers or SimpleHuman’s sliding tiered bins deliver real versatility. These aren’t just static containers—they adapt. For example, during holiday baking season, we can expand a bin to fit extra flour and sugar bags, then shrink it back for everyday items.
The key is choosing baskets with tool-free adjustment mechanisms so we aren’t fumbling with screws or clips every time we reorganize.
In our experience, the best adjustable bins also feature soft-close glides and full extension, making it easy to access items at the very back. We suggest opting for baskets with perforated sides—they allow airflow and visibility, so we can spot expired items or dwindling supplies at a glance.
And if we’re storing produce or snacks, adding removable liners keeps things clean without sacrificing flexibility. These smart investments grow with our pantry’s evolving rhythm.
Best Containers for a Pull Out Pantry (And Which Ones to Skip)
| Container Type | Best For | Pros | Cons |
|---|---|---|---|
| Stackable Acrylic Bins | Dry goods, snacks, pasta | Clear visibility, durable, stack well | Limited airtight seal |
| Airtight Glass Jars | Flour, sugar, coffee, grains | Airtight, non-toxic, stylish | Heavy, breakable, expensive |
| Collapsible Silicone Containers | Occasional overflow, seasonal items | Space-saving when empty, flexible | Not stackable when full, less sturdy |
| Plastic Pantry Bins with Lids | Bulk items, cereals, legumes | Affordable, lightweight, airtight | Can stain, may warp over time |
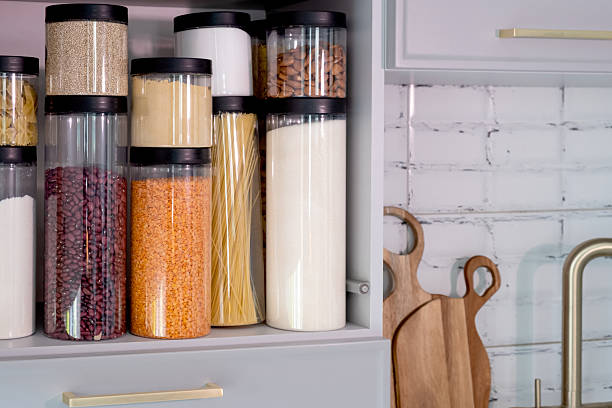
Choosing the right containers can make or break a pull-out pantry’s functionality. We’ve tested a wide range and found that stackable acrylic bins strike the best balance between visibility, durability, and fit. They’re perfect for grouping similar dry goods and work seamlessly on sliding shelves.
Their clarity means we don’t have to open every bin to find what we need—a small but impactful time-saver during meal prep.
For long-term storage of perishable dry goods like flour or coffee, we strongly recommend airtight glass jars. They keep contents fresh for months and add a clean, upscale look. However, we caution against using them on upper pull-out tiers—they’re heavy and pose a safety risk if the shelf jostles.
We suggest reserving them for lower, more stable levels where their weight is less of a concern.
While collapsible silicone containers sound ideal for tight spaces, we’ve found they’re better suited for occasional use than daily organization. They lack rigidity when full, which makes stacking unreliable. Similarly, we advise skipping decorative tins or flimsy cardboard boxes—they look nice but fail functionally.
Instead, we focus on containers that deliver both form and function, especially those with uniform footprints for seamless stacking and sliding.
Stacking Strategies for Canned Goods and Small Items
Maximizing space in a pull-out pantry means getting smart about how we stack canned goods and small items. We always start by sorting by type and expiration date, placing older items in front using the “first in, first out” method. This simple habit reduces food waste and keeps our inventory fresh.
For optimal visibility, we recommend single-file rows instead of deep stacks—this way, we can see every label without digging.
We’ve found that tiered can organizers—like the Cascade Selects Pull-Out Can Rack—are game-changers. These angled trays let us stack cans 2–3 high while still seeing each label, and they slide out smoothly without wobbling. For pantries with limited depth, we suggest using vertical dividers to create narrow columns, preventing cans from toppling when the shelf moves.
This level of control is essential in a high-traffic kitchen.
For small items like spice packets, tea bags, or seasoning pouches, we use shallow stackable bins no taller than 3 inches. Grouping by category—baking, international, beverages—makes them easy to locate. We place these bins on upper pull-out shelves where they’re visible but out of the way.
The trick is to limit stacking to two levels max to avoid creating clutter traps that are hard to access or maintain.
Lighting and Labeling Tips You’ll Wish You Knew Sooner
One of the most overlooked aspects of pantry organization is lighting—we’ve seen too many deep pull-out pantries where items get lost in the shadows. Installing LED strip lights along the inner edges or top shelf can transform visibility, especially in cabinets deeper than 18 inches.
Auto-sensing lights that turn on when the pantry glides open are a game-changer, eliminating the need to fumble in the dark. We recommend choosing cool white (4000K–5000K) for a crisp, energizing glow that makes labels and expiration dates easier to read.
When it comes to labeling, consistency is everything. We suggest using a label maker with waterproof tape or adhesive chalkboard labels for a clean, uniform look. Label not just the containers, but also the shelf zones—like “Breakfast,” “Snacks,” or “Baking Supplies”—to create a system anyone in the household can follow.
Our favorite trick? Add dates on perishable items like grains or nuts, so you rotate stock efficiently and reduce waste over time.
For maximum impact, pair labels with clear, uniform containers in square or rectangular shapes—they maximize space and look neater than odd-sized jars. We’ve found that 32-oz and 64-oz glass or BPA-free plastic bins work best for staples like pasta, rice, and cereal. Use color-coding: green for breakfast, red for snacks, blue for baking.
This visual cue system speeds up meal prep and helps kids identify zones. Lighting plus smart labeling doesn’t just organize—it makes your pantry actually enjoyable to use.
Pull Out Pantry Upgrades That Feel Like a Kitchen Remodel
Upgrading your pull-out pantry doesn’t require a full kitchen overhaul to feel transformative. We’ve found that swapping out basic wire shelves for full-extension, soft-close drawer systems instantly elevates both function and feel. Brands like Blum Motion or Hafele offer glide mechanisms that support up to 100 lbs, ensuring smooth operation even when fully loaded.
These drawer-style upgrades eliminate the awkward reach-and-guess game, making every inch of your pantry accessible and intentional.
Another high-impact upgrade? Adding tiered shelving or cascading baskets inside the pull-out unit. This allows you to see everything at a glance—no more forgotten cans at the back. We recommend pull-out wire baskets with front lips to prevent items from sliding.
For taller pantries, installing a spice carousel or narrow appliance garage on a lower tier keeps high-use items within easy reach while maintaining a streamlined look.
Don’t overlook the back panel—adding a chalkboard or peel-and-stick vinyl panel gives you a spot to jot down inventory or meal plans. We’ve seen homeowners take it further with integrated charging stations or under-shelf paper towel holders. These small touches create a custom, high-end feel.
The result? A pantry that functions like a luxury kitchen feature, not just storage—without the six-figure renovation price tag.
Frequently Asked Questions
What is the best way to organize a pull out pantry?
We recommend grouping items by category—like baking supplies, snacks, and canned goods—for easier access. Use clear containers for dry goods to maintain freshness and visibility. We’ve found that adding adjustable shelves and pull-out baskets maximizes space and prevents items from getting lost in the back.
How do I keep my pull out pantry from getting messy?
We suggest labeling every container and shelf to maintain order. In our experience, doing a weekly check to restock and wipe down shelves prevents clutter. Use door-mounted racks for spices or small items, and avoid overloading shelves to keep everything visible and accessible.
What size pull out pantry is most functional?
A width of 18 to 24 inches offers ample space without compromising cabinet stability. We’ve found that full-extension glides work best for 20-inch deep units, allowing full access to contents. For taller households, we recommend tiered shelving to see items at the back without reaching.
Can I add a pull out pantry to an existing cabinet?
Yes, we’ve successfully converted standard cabinets by installing slide-out shelving kits available at most home improvement stores. Measure your cabinet’s interior precisely and choose a system with weight capacity for your needs. With basic tools, most installations take under two hours.
What are the best containers for a pull out pantry?
We recommend stackable, airtight containers made of BPA-free plastic or glass for long-term freshness. Look for ones with squared corners to maximize space and uniform shapes for easy stacking. We’ve found that clear labels and consistent sizing create a clean, organized look.
Final Thoughts
Organizing a pull out pantry doesn’t require a full kitchen remodel—we’ve found that even small upgrades make a big difference in daily efficiency. By using smart storage solutions like labeled containers, adjustable shelves, and full-extension glides, we can turn a cluttered space into a functional, easy-to-navigate hub for all our kitchen essentials.
Start by assessing your current pantry and identifying problem areas. In our experience, even dedicating one afternoon to reorganize and invest in a few key tools pays off in long-term convenience. With a little planning, we can all enjoy a cleaner, more efficient kitchen.